Resizing consoles automatically
I have 2 very useful shell scripts related to resizing consoles. The first is imaginatively called resize and just configures the terminal to be the requested size, neatly resizing an xterm or gnome-terminal:
#!/bin/sh

# resize <rows> <columns>
/bin/echo -e '\033[8;'$1';'$2't'
The other is a bit more complicated and useful when connecting to a host via a serial console, or when driving a qemu VM with -display none -nographic and all output coming over a “serial console” on stdio. It figures out the size of the terminal it’s running in and correctly sets the local settings to match so you can take full advantage of a larger terminal than the default 80x24:
#!/bin/bash

echo -ne '\e[s\e[5000;5000H'
IFS='[;' read -p $'\e[6n' -d R -a pos -rs
echo -ne '\e[u'

# cols / rows
echo "Size: ${pos[2]} x ${pos[1]}"

stty cols "${pos[2]}" rows "${pos[1]}"

export TERM=xterm-256color
Generally I source this with . fix-term or the TERM export doesn’t get applied. Both of these exist in various places around the ‘net (and there’s a resize binary shipped along with xterm) but I always forget the exact terms to find it again when I need it. So this post is mostly intended to serve as future reference next time I don’t have them handy.
Neat uses for a backlit keyboard
I bought myself a new keyboard last November, a Logitech G213. True keyboard fans will tell me it’s not a real mechanical keyboard, but it was a lot cheaper and met my requirements of having some backlighting and a few media keys (really all I use are the volume control keys). Oh, and being a proper UK layout.
While the G213 isn’t fully independent RGB per key it does have a set of zones that can be controlled. Also this has been reverse engineered, so there are tools to do this under Linux. All I really wanted was some basic backlighting to make things a bit nicer in the evenings, but with the ability to control colour I felt I should put it to good use.
As previously mentioned I have a personal desktop / work laptop setup combined with a UGREEN USB 3.0 Sharing Switch Box, so the keyboard is shared between both machines. So I configured up both machines to set the keyboard colour when the USB device is plugged in, and told them to use different colours. Instant visual indication of which machine I’m currently typing on!
Running the script on USB detection is easy, a file in /etc/udev/rules.d/. I called it 99-keyboard-colour.rules:
# Change the keyboard colour when we see it
ACTION=="add", SUBSYSTEM=="usb", ATTR{idVendor}=="046d", ATTR{idProduct}=="c336", \
        RUN+="/usr/local/sbin/g213-set"
g213-set is a simple bit of Python:
#!/usr/bin/python3

import sys

found = False
devnum = 0
while not found:
    try:
        with open("/sys/class/hidraw/hidraw" + str(devnum) + "/device/uevent") as f:
            for line in f:
                line = line.rstrip()
                if line == 'HID_NAME=Logitech Gaming Keyboard G213':
                    found = True
    except:
        break

    if not found:
        devnum += 1

if not found:
    print("Could not find keyboard device")
    sys.exit(1)

eventfile = "/dev/hidraw" + str(devnum)

#                                   z       r     g     b
command = [ 0x11, 0xff, 0x0c, 0x3a, 0, 1, 0xff, 0xff, 0x00, 2, 0, 0, 0, 0, 0, 0, 0, 0, 0, 0 ]

with open(eventfile, "wb") as f:
    f.write(bytes(command))
I did wonder about trying to make it turn red when I’m in a root terminal, but that gets a bit more complicated (I’m guessing I need to hook into GNOME Terminal some how?) and this simple hack gives me a significant win anyway.
Upgrading my home internet; a story of yak shaving
This has ended up longer than I expected. I’ll write up posts about some of the individual steps with some more details at some point, but this is an overview of the yak shaving I engaged in. The TL;DR is:
- I wanted to upgrade my internet connection, but:
- My router wasn’t fast enough, so:
- I bought a new one and:
- Proceeded to help work on mainline Linux support, and:
- Did some tweaking of my Debian setup to allow for a squashfs root, and:
- Upgraded it to Debian 11 (bullseye) in the process, except:
- It turned out my home automation devices weren’t happy, so:
- I dug into some memory issues on my ESP8266 firmware, which:
- Led to diagnosing some TLS interaction issues with the firmware, and:
- I had an interlude into some interrupt affinity issues, but:
- I finally got there.
The desire for a faster connection
When I migrated my home connection to FTTP I kept the same 80M/20M profile I’d had on FTTC. I didn’t have a pressing need for faster, and I saved money because I was no longer paying for the phone line portion. I wanted more, but at the time I think the only option was for a 160M/30M profile instead and I didn’t need it and it wasn’t enough better to convince me.
Time passed and BT rolled out their GigE (really 900M) download option. And again, I didn’t need it, but I wanted it. My provider, Aquiss, initially didn’t offer this (I think they had up to 330M download options available by this point). So I stayed on 80M/20M. And the only time I really wanted it to be faster was when pushing off-site backups to rsync.net.
Of course, we’ve had the pandemic, and that’s involved 2 adults working from home with plenty of video calls throughout the day. The 80M/20M connection has proved rock solid for this, so again, I didn’t feel an upgrade was justified. We got a 4K capable TV last year and while the bandwidth usage for 4K streaming is noticeably higher, again the connection can handle it no problem.
At some point last year I noticed Aquiss had added speed options all the way to 900M down. At the end of the year I accepted a new role, which is fully remote, so I had a bit of an acceptance about the fact that I wasn’t going back into an office any time soon. The combination (and the desire for the increased upload speed) finally allowed me to justify the upgrade to myself.
Testing the current setup for bottlenecks
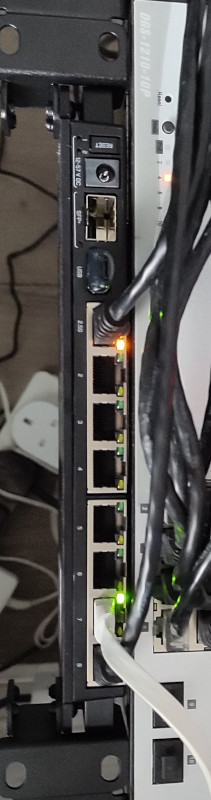
The first thing to do was see whether my internal network could cope with an upgrade. I’m mostly running Cat6 GigE so I wasn’t worried about that side of things. However I’m using an RB3011 as my core router, and while it has some coprocessors for routing acceleration they’re not supported under mainline Linux (and unlikely to be any time soon). So I had to benchmark what it was capable of routing. I run a handful of VLANs within my home network, with stateful firewalling between them, so I felt that would be a good approximation of the maximum speed to the outside world I might be able to get if I had the external connection upgraded. I went for the easy approach and fired up iPerf3 on 2 hosts, both connected via ethernet but on separate networks, so routed through the RB3011. That resulted in slightly more than a 300Mb/s throughput. Ok. I confirmed that I could get 900Mb/s+ on 2 hosts both on the same network, just to be sure there wasn’t some other issue I was missing. Nope, so unsurprisingly the router was the bottleneck.
So. To upgrade my internet speed I need to upgrade my router. I could just buy something off the shelf, but I like being able to run Debian (or OpenWRT) on the router rather than some horrible vendor firmware. Lucky MikroTik launched the RB5009 towards the end of last year. RouterOS is probably more than capable, but what really interested me was the fact it’s an ARM64 platform based on an Armada 7040, which is pretty well supported in mainline kernels already. There’s a 10G connection from the internal switch to the CPU, as well as a 2.5Gb/s ethernet port and a 10G SFP+ cage. All good stuff. I ordered one just before the New Year.
Thankfully the OpenWRT folk had done all of the hard work on getting a mainline kernel booting on the device; Sergey Sergeev and Robert Marko in particular fighting RouterBoot and producing a suitable device tree file to get everything up and running. I ended up soldering a serial console connection up to aid debugging, and lightly patching Rob’s u-boot to fix the incorrect RAM size reported by RouterBoot. A few kernel tweaks were necessary to make the networking entirely happy and at that point it was time to think about actually doing a replacement.
Upgrading to Debian 11 (bullseye)
My RB3011 is currently running Debian 10 (buster); an upgrade has been on my todo list, but with the impending replacement I decided I’d hold off and create a new Debian 11 (bullseye) image for the RB5009. Additionally, I don’t actually run off the internal NAND in the RB3011; I have a USB flash drive for the rootfs and just the kernel booting off internal NAND. Originally this was for ease of testing, then a combination of needing to figure out a good read-only root solution and a small enough image to fit in the 120M available. For the upgrade I decided to finally look at these pieces. I’ve ended up with a script that will build me a squashfs image, and the initial rootfs takes care of mounting this and then a tmpfs as an overlay fs. That means I can easily see what pieces are being written to. The RB5009 has a total of 1G NAND so I’m not as space constrained, but the squashfs ends up under 50M. I’ve added some additional pieces to allow me to pre-populate the overlay fs with updates rather than always needing to rebuild the squashfs image.
With that done I decided to try it out on the RB3011; I tweaked the build script to be able to build for armhf (the RB3011) or arm64 (the RB5009) and to deal with some slight differences in configuration between the two (e.g. interface naming). The idea here was to ensure I’d got all the appropriate configuration sorted for the RB5009, in the known-good existing environment. Everything is still on a USB stick at this stage and the new device has an armhf busybox root meaning it can be used on either device, and the init script detects the architecture to select the appropriate squashfs to mount.
A problem with ESP8266 home automation devices
Everything seemed to work fine - a few niggles with the watchdog, which is overly sensitive on the RB3011, but I got those sorted (and the build script updated) and the device came up and successfully did the PPPoE dance to bring up external connectivity. And then I noticed that my home automation devices were having problems connecting to the mosquitto MQTT server. It turned out it was only the ESP8266 based devices that were failing, and examining the serial debug output on one of my test devices revealed it was hitting an out of memory issue (displaying E:M 280) when establishing the TLS MQTT connection.
I rolled back to the Debian 10 image and set about creating a test environment to look at the ESP8266 issues. My first action was to try and reduce my RAM footprint to try and ensure there was enough spare to establish the connection. I moved a few functions that were still sitting in IRAM into flash. I cleaned up a couple of buffers that are on the stack to be more correctly sized. I tried my new image, and I didn’t get the memory issue. Instead I progressed a bit further and got a watchdog reset. Doh!
It was obviously something related to the TLS connection, but I couldn’t easily see what the difference was; the same x509 cert was in use, it looked like the initial handshake was the same (and trying with openssl s_client looked pretty similar too). I set about instrumenting the ancient Mbed TLS used in the Espressif SDK and discovered that whatever had changed between buster + bullseye meant the EPS8266 was now trying a TLS-DHE-RSA-WITH-AES-256-CBC-SHA256 handshake instead of a TLS-RSA-WITH-AES-256-CBC-SHA256 handshake and that was causing enough extra CPU usage that it couldn’t complete in time and the watchdog kicked in. So I commented out MBEDTLS_KEY_EXCHANGE_DHE_RSA_ENABLED in the config_esp.h for mbedtls and rebuilt things. Hacky, but I’ll go back to trying to improve this generally at some point.
A detour into interrupt load
Now, my testing of the RB3011 image is generally done at weekends, when I have enough time to tear down and rebuild the connection rather than doing it in the evening and having limited time to get things working again in time for work in the morning. So at the point I had an image ready to go I pulled the trigger on the line upgrade. I went with the 500M/75M option rather than the full 900M - I suspect I’d have difficulty actually getting that most of the time and 75M of upload bandwidth seems fairly substantial for now. It only took a couple of days from the order to the point the line was regraded (which involved no real downtime - just a reconnection in the night). Of course this happened just after the weekend I’d discovered the ESP8266 issue.
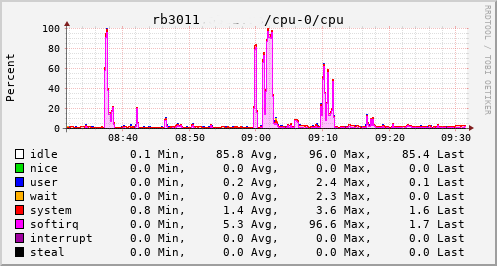
This provided an opportunity to see just what the RB3011 could actually manage. In the configuration I had it turned out to be not much more than the 80Mb/s speeds I had previously seen. The upload jumped from a solid 20Mb/s to 75Mb/s, so I knew the regrade had actually happened. Looking at CPU utilisation clearly showed the problem; softirqs were using almost 100% of a CPU core.
Now, the way the hardware is setup on the RB3011 is that there are two separate 5 port switches, each connected back to the CPU via a separate GigE interface. For various reasons I had everything on a single switch, which meant that all traffic was boomeranging in and out of the same CPU interface. The IPQ8064 has dual cores, so I thought I’d try moving the external connection to the other switch. That puts it on its own GigE CPU interface, which then allows binding the interrupts to a different CPU core. That helps; throughput to the outside world hits 140Mb/s+. Still a long way from the expected max, but proof we just need more grunt.
Success
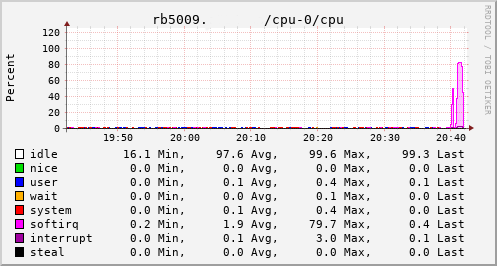
Which brings us to this past weekend, when, having worked out all the other bits, I tried the squashfs root image again on the RB3011. Success! The home automation bits connected to it, the link to the outside world came up, everything seemed happy. So I double checked my bootloader bits on the RB5009, brought it down to the comms room and plugged it in instead. And, modulo my failing to update the nftables config to allow it to do forwarding, it all came up ok. Some testing with iperf3 internally got a nice 912Mb/s sustained between subnets, and some less scientific testing with wget + speedtest-cli saw speeds of over 460Mb/s to the outside world.
Time from ordering the router until it was in service? Just under 8 weeks…
Free Software Activities for 2021
About a month later than I probably should have posted it, here’s a recap of my Free Software activities in 2021. For previous years see 2019 + 2020. Again, this year had fewer contributions than I’d like thanks to continuing fatigue about the state of the world, and trying to work on separation between work and leisure while working from home. I’ve made some effort to improve that balance but it’s still a work in progress.
Conferences
No surprise, I didn’t attend any in-person conferences in 2021. I find virtual conferences don’t do a lot for me (a combination of my not carving time out for them in the same way, because not being “at the conference” means other things will inevitably intrude, and the lack of the social side) but I did get to attend a few of the DebConf21 talks, which was nice. I’m hoping to make it to DebConf22 this year in person.
Debian
Most of my contributions to Free software continue to happen within Debian.
As part of the Data Protection Team I responded to various inbound queries to that team. Some of this involved chasing up other project teams who had been slow to respond - folks, if you’re running a service that stores personal data about people then you need to be responsive to requests about it. Some of this was dealing with what look like automated scraping tools which send no information about the person making the request, and in all the cases we’ve seen so far there’s been no indication of any data about that person on any systems we have access to. Further team time was wasted dealing with the Princeton-Radboud Study on Privacy Law Implementation (though Matthew did the majority of the work on this).
The Debian Keyring was possibly my largest single point of contribution. We’re in a roughly 3 month rotation of who handles the keyring updates, and I handled 2021.03.24, 2021.04.09, 2021.06.25, 2021.09.25 + 2021.12.24
For Debian New Members I’m mostly inactive as an application manager - we generally seem to have enough available recently. If that changes I’ll look at stepping in to help, but I don’t see that happening. I continue to be involved in Front Desk, having various conversations throughout the year with the rest of the team, but there’s no doubt Mattia and Pierre-Elliott are the real doers at present. I did take part in an NM Committee appeals process.
In terms of package uploads I continued to work on gcc-xtensa-lx106, largely doing uploads to deal with updates to the GCC version or packaging (8 + 9). sigrok had a few minor updates, libsigkrok 0.5.2-3, pulseview 0.4.2-3 as well as a new upstream release of sigrok CLI 0.7.2-1. There was a last minute pre-release upload of libserialport 0.1.1-4 thanks to a kernel change in v5.10.37 which removed termiox support.
Despite still not writing any VHDL these days I continue to keep an eye on ghdl, because I found it a useful tool in the past. Last year that was just a build fix for LLVM 11.1.0 - 1.0.0+dfsg+5. Andreas Bombe has largely taken over more proactive maintenance, which is nice to see.
I uploaded OpenOCD 0.11.0~rc1-2, cleaning up some packaging / dependency issues. This was followed by 0.11.0~rc2-1 as a newer release candidate. Sadly 0.11.0 did not make it in time for bullseye, but rc2 was fairly close and I uploaded 0.11.0-1 once bullseye was released.
Finally I did a drive-by upload for garmin-forerunner-tools 0.10repacked-12, cleaning up some packaging issues and uploading it to salsa. My Forerunner 305 has died (after 11 years of sterling service) and the Forerunner 45 I’ve replaced it with uses a different set of tools, so I decided it didn’t make sense to pick up longer term ownership of the package.
Linux
My Linux contributions continued to revolve around pushing MikroTik RB3011 support upstream. There was a minor code change to Set FIFO sizes for ipq806x (which fixed up the allowed MTU for the internal switch + VLANs). The rest was DTS related - adding ADM DMA + NAND definitions now that the ADM driver was merged, adding tsens details, adding USB port info and adding the L2CC and RPM details for IPQ8064. Finally I was able to update the RB3011 DTS to enable NAND + USB.
With all those in I’m down to 4 local patches against a mainline kernel, all of which are hacks that aren’t suitable for submission upstream. 2 are for patching in details of the root device and ethernet MAC addresses, one is dealing with the fact the IPQ8064 has some reserved memory that doesn’t play well with AUTO_ZRELADDR (there keeps being efforts to add some support for this via devicetree, but unfortunately it gets shot down every time), and the final one is a hack to turn off the LCD backlight by treating it as an LED (actually supporting the LCD properly is on my TODO list).
Personal projects
2021 didn’t see any releases of onak. It’s not dead, just resting, but Sequoia PGP is probably where you should be looking for a modern OpenPGP implementation.
I continued work on my Desk Viking project, which is an STM32F103 based debug tool inspired by the Bus Pirate. The main addtion was some CCLib support (forking it in the process to move to Python 3 and add some speed ups) to allow me to program my Zigbee dongles, but I also added some 1-Wire search logic and some support for “Linux emulation mode” with VCD output to allow for a faster development cycle. I really want to try and get OpenOCD JTAG mode supported at some point, and have vague plans for an STM32F4 based version that have suffered from a combination of a silicon shortage and a lack of time.
That wraps up 2021. I’d like to say I’m hoping to make more Free Software contributions this year, but I don’t have a concrete plan yet for how that might happen, so I’ll have to wait and see.
Upgrading from a CC2531 to a CC2538 Zigbee coordinator
Previously I setup a CC2531 as a Zigbee coordinator for my home automation. This has turned out to be a good move, with the 4 gang wireless switch being particularly useful. However the range of the CC2531 is fairly poor; it has a simple PCB antenna. It’s also a very basic device. I set about trying to improve the range and scalability and settled upon a CC2538 + CC2592 device, which feature an MMCX antenna connector. This device also has the advantage that it’s ARM based, which I’m hopeful means I might be able to build some firmware myself using a standard GCC toolchain.
For now I fetched the JetHome firmware from https://github.com/jethome-ru/zigbee-firmware/tree/master/ti/coordinator/cc2538_cc2592 (JH_2538_2592_ZNP_UART_20211222.hex) - while it’s possible to do USB directly with the CC2538 my board doesn’t have those bits so going the external USB UART route is easier.
The device had some existing firmware on it, so I needed to erase this to force a drop into the boot loader. That means soldering up the JTAG pins and hooking it up to my Bus Pirate for OpenOCD goodness.
OpenOCD config
source [find interface/buspirate.cfg]

buspirate_port /dev/ttyUSB1
buspirate_mode normal
buspirate_vreg 1
buspirate_pullup 0

transport select jtag

source [find target/cc2538.cfg]
Steps to erase
$ telnet localhost 4444
Trying ::1...
Trying 127.0.0.1...
Connected to localhost.
Escape character is '^]'.
Open On-Chip Debugger
> mww 0x400D300C 0x7F800
> mww 0x400D3008 0x0205
> shutdown
shutdown command invoked
Connection closed by foreign host.
At that point I can switch to the UART connection (on PA0 + PA1) and flash using cc2538-bsl:
$ git clone https://github.com/JelmerT/cc2538-bsl.git
$ cc2538-bsl/cc2538-bsl.py -p /dev/ttyUSB1 -e -w -v ~/JH_2538_2592_ZNP_UART_20211222.hex
Opening port /dev/ttyUSB1, baud 500000
Reading data from /home/noodles/JH_2538_2592_ZNP_UART_20211222.hex
Firmware file: Intel Hex
Connecting to target...
CC2538 PG2.0: 512KB Flash, 32KB SRAM, CCFG at 0x0027FFD4
Primary IEEE Address: 00:12:4B:00:22:22:22:22
    Performing mass erase
Erasing 524288 bytes starting at address 0x00200000
    Erase done
Writing 524256 bytes starting at address 0x00200000
Write 232 bytes at 0x0027FEF88
    Write done
Verifying by comparing CRC32 calculations.
    Verified (match: 0x74f2b0a1)
I then wanted to migrate from the old device to the new without having to repair everything. So I shut down Home Assistant and backed up the CC2531 network information using zigpy-znp (which is already installed for Home Assistant):
python3 -m zigpy_znp.tools.network_backup /dev/zigbee > cc2531-network.json
I copied the backup to cc2538-network.json and modified the coordinator_ieee to be the new device’s MAC address (rather than end up with 2 devices claiming the same MAC if/when I reuse the CC2531) and did:
python3 -m zigpy_znp.tools.network_restore --input cc2538-network.json /dev/ttyUSB1
The old CC2531 needed unplugged first, otherwise I got an RuntimeError: Network formation refused, RF environment is likely too noisy. Temporarily unscrew the antenna or shield the coordinator with metal until a network is formed. error.
After that I updated my udev rules to map the CC2538 to /dev/zigbee and restarted Home Assistant. To my surprise it came up and detected the existing devices without any extra effort on my part. However that resulted in 2 coordinators being shown in the visualisation, with the old one turning up as unk_manufacturer. Fixing that involved editing /etc/homeassistant/.storage/core.device_registry and removing the entry which had the old MAC address, removing the device entry in /etc/homeassistant/.storage/zha.storage for the old MAC and then finally firing up sqlite to modify the Zigbee database:
$ sqlite3 /etc/homeassistant/zigbee.db
SQLite version 3.34.1 2021-01-20 14:10:07
Enter ".help" for usage hints.
sqlite> DELETE FROM devices_v6 WHERE ieee = '00:12:4b:00:11:11:11:11';
sqlite> DELETE FROM endpoints_v6 WHERE ieee = '00:12:4b:00:11:11:11:11';
sqlite> DELETE FROM in_clusters_v6 WHERE ieee = '00:12:4b:00:11:11:11:11';
sqlite> DELETE FROM neighbors_v6 WHERE ieee = '00:12:4b:00:11:11:11:11' OR device_ieee = '00:12:4b:00:11:11:11:11';
sqlite> DELETE FROM node_descriptors_v6 WHERE ieee = '00:12:4b:00:11:11:11:11';
sqlite> DELETE FROM out_clusters_v6 WHERE ieee = '00:12:4b:00:11:11:11:11';
sqlite> .quit
So far it all seems a bit happier than with the CC2531; I’ve been able to pair a light bulb that was previously detected but would not integrate, which suggests the range is improved.
(This post another in the set of “things I should write down so I can just grep my own website when I forget what I did to do foo”.)
subscribe via RSS