Setting up FreshRSS in a subdirectory
Ever since the demise of Google Reader I have been looking for a suitable replacement RSS reader. In the past I used to use Liferea but that was when I used a single desktop machine; these days I want to be able to read on my phone and multiple machines. I moved to Feedly and it’s been mostly ok, but I’m hitting the limit of feeds available in the free tier, and $72/year is a bit more than I can justify to myself. Especially when I have machines already available to me where I could self host something.
The problem, of course, is what to host. It seems the best options are all written in PHP, so I had to get over my adverse knee-jerk reaction to that. I ended up on FreshRSS but if it hadn’t worked out I’d have tried TinyTinyRSS. Of course I’m hosting on Debian, and the machine I chose to use was already running nginx and PostgreSQL. So I needed to install PHP:
$ sudo apt install php7.4-fpm php-curl php-gmp php-intl php-mbstring \
	php-pgsql php-xml php-zip
I put my FreshRSS install in /srv/freshrss so I grabbed the 1.20.2 release from GitHub (actually 1.20.1 at the time, but I’ve upgraded to the latest since) and untared it in there. I gave www-data access to the data directory (sudo chown -R www-data /srv/freshrss/data) (yes, yes, I could have created a new user specifically for FreshRSS, but I’ve chosen not to for now). There’s no actual need to configure things up on the filesystem, you can do the initial setup from the web interface. Which is where the trouble came. I’ve been an Apache user since 1998 and as a result it’s what I know and what I go to. nginx is new to me. And I wanted my FreshRSS instance to live in a subdirectory of an existing TLS-enabled host, rather than have it’s own hostname. Now, at least FreshRSS copes with this (unlike far too many other projects), you just have to configure your webserver correctly. Which took me more experimentation than I’d like, but I’ve ended up with the following snippet:
    # PHP files handling
    location ~ ^/freshrss/.+?\.php(/.*)?$ {
        root /srv/freshrss/p;
        fastcgi_pass unix:/run/php/php-fpm.sock;
        fastcgi_split_path_info ^/freshrss(/.+\.php)(/.*)?$;
        set $path_info $fastcgi_path_info;
        fastcgi_param PATH_INFO $path_info;
        include fastcgi_params;
        fastcgi_param SCRIPT_FILENAME $document_root$fastcgi_script_name;
    }

    location ~ ^/freshrss(/.*)?$ {
        root /srv/freshrss/p;
        try_files $1 /freshrss$1/index.php$is_args$args;
    }
Other than the addition of the freshrss prefix this ends up differing slightly from the FreshRSS webserver configuration example. I ended up having to make the path info on the fastcgi_split_path_info optional, and my try_files in the bare directory location directive needed $is_args$args added or I just ended up in a redirect loop because the session parameters didn’t get passed through. I’m sure there’s a better way to do it, but I did a bunch of searching and this is how I ended up making it work.
Before firing up the web configuration I created a suitable database:
$ sudo -Hu postgres psql
psql (13.8 (Debian 13.8-0+deb11u1))
Type "help" for help.

postgres=# create database freshrss;
CREATE DATABASE
postgres=# create user freshrss with encrypted password 'hunter2';
CREATE ROLE
postgres=# grant all privileges on database freshrss to freshrss;
GRANT
postgres=# \q
I ran through the local configuration, creating myself a user and adding some feeds, then created a cronjob to fetch updates hourly and keep a log:
# mkdir /var/log/freshrss
# chown :www-data /var/log/freshrss
# chmod 775 /var/log/freshrss
# cat > /etc/cron.d/freshrss-refresh <EOF
33 * * * * www-data /srv/freshrss/app/actualize_script.php > /var/log/freshrss/update-$(date --iso-8601=minutes).log 2>&1
EOF
Experiences so far? Reasonably happy. The interface seems snappy enough, and works well both on mobile and desktop. I’m only running a single user instance at present, but am considering opening it up to some other folk and will see how that scales. And it clearly indicated a number of my feeds that were broken, so I’ve cleaned some up that are still around and deleted the missing ones. Now I just need to figure out what else I should be subscribed to that I’ve been putting off due to the Feedly limit!
onak 0.6.2 released
Over the weekend I released a new version of onak, my OpenPGP compatible keyserver. At 2 years since the last release that means I’ve at least managed to speed up a bit, but it’s fair to say its development isn’t a high priority for me at present.
This release is largely driven by a collection of minor fixes that have built up, and the knowledge that a Debian freeze is coming in the new year. The fixes largely revolve around the signature verification that was introduced in 0.6.0, which makes it a bit safer to run a keyserver by only accepting key material that can be validated. All of the major items I wanted to work on post 0.6.0 remain outstanding.
For the next release I’d like to get some basic Stateless OpenPGP Command Line Interface support integrated. That would then allow onak to be tested with the OpenPGP interoperability test suite, which has recently added support for verification only OpenPGP implementations.
I realise most people like to dismiss OpenPGP, and the tooling has been fairly dreadful for as long as I’ve been using it, but I do think it fills a space that no competing system has bothered to try and replicate. And that’s the web of trust, which helps provide some ability to verify keys without relying on (but also without preventing) a central authority to do so.
Anyway. Available locally or via GitHub.
0.6.2 - 27th November 2022
- Don’t take creation time from unhashed subpackets
- Fix ECDSA/SHA1 signature check
- Fix handling of other signature requirement
- Fix deletion of keys with PostgreSQL backend
- Add support for verifying v3 signature packets
Resizing consoles automatically
I have 2 very useful shell scripts related to resizing consoles. The first is imaginatively called resize and just configures the terminal to be the requested size, neatly resizing an xterm or gnome-terminal:
#!/bin/sh

# resize <rows> <columns>
/bin/echo -e '\033[8;'$1';'$2't'
The other is a bit more complicated and useful when connecting to a host via a serial console, or when driving a qemu VM with -display none -nographic and all output coming over a “serial console” on stdio. It figures out the size of the terminal it’s running in and correctly sets the local settings to match so you can take full advantage of a larger terminal than the default 80x24:
#!/bin/bash

echo -ne '\e[s\e[5000;5000H'
IFS='[;' read -p $'\e[6n' -d R -a pos -rs
echo -ne '\e[u'

# cols / rows
echo "Size: ${pos[2]} x ${pos[1]}"

stty cols "${pos[2]}" rows "${pos[1]}"

export TERM=xterm-256color
Generally I source this with . fix-term or the TERM export doesn’t get applied. Both of these exist in various places around the ‘net (and there’s a resize binary shipped along with xterm) but I always forget the exact terms to find it again when I need it. So this post is mostly intended to serve as future reference next time I don’t have them handy.
Neat uses for a backlit keyboard
I bought myself a new keyboard last November, a Logitech G213. True keyboard fans will tell me it’s not a real mechanical keyboard, but it was a lot cheaper and met my requirements of having some backlighting and a few media keys (really all I use are the volume control keys). Oh, and being a proper UK layout.
While the G213 isn’t fully independent RGB per key it does have a set of zones that can be controlled. Also this has been reverse engineered, so there are tools to do this under Linux. All I really wanted was some basic backlighting to make things a bit nicer in the evenings, but with the ability to control colour I felt I should put it to good use.
As previously mentioned I have a personal desktop / work laptop setup combined with a UGREEN USB 3.0 Sharing Switch Box, so the keyboard is shared between both machines. So I configured up both machines to set the keyboard colour when the USB device is plugged in, and told them to use different colours. Instant visual indication of which machine I’m currently typing on!
Running the script on USB detection is easy, a file in /etc/udev/rules.d/. I called it 99-keyboard-colour.rules:
# Change the keyboard colour when we see it
ACTION=="add", SUBSYSTEM=="usb", ATTR{idVendor}=="046d", ATTR{idProduct}=="c336", \
        RUN+="/usr/local/sbin/g213-set"
g213-set is a simple bit of Python:
#!/usr/bin/python3

import sys

found = False
devnum = 0
while not found:
    try:
        with open("/sys/class/hidraw/hidraw" + str(devnum) + "/device/uevent") as f:
            for line in f:
                line = line.rstrip()
                if line == 'HID_NAME=Logitech Gaming Keyboard G213':
                    found = True
    except:
        break

    if not found:
        devnum += 1

if not found:
    print("Could not find keyboard device")
    sys.exit(1)

eventfile = "/dev/hidraw" + str(devnum)

#                                   z       r     g     b
command = [ 0x11, 0xff, 0x0c, 0x3a, 0, 1, 0xff, 0xff, 0x00, 2, 0, 0, 0, 0, 0, 0, 0, 0, 0, 0 ]

with open(eventfile, "wb") as f:
    f.write(bytes(command))
I did wonder about trying to make it turn red when I’m in a root terminal, but that gets a bit more complicated (I’m guessing I need to hook into GNOME Terminal some how?) and this simple hack gives me a significant win anyway.
Upgrading my home internet; a story of yak shaving
This has ended up longer than I expected. I’ll write up posts about some of the individual steps with some more details at some point, but this is an overview of the yak shaving I engaged in. The TL;DR is:
- I wanted to upgrade my internet connection, but:
- My router wasn’t fast enough, so:
- I bought a new one and:
- Proceeded to help work on mainline Linux support, and:
- Did some tweaking of my Debian setup to allow for a squashfs root, and:
- Upgraded it to Debian 11 (bullseye) in the process, except:
- It turned out my home automation devices weren’t happy, so:
- I dug into some memory issues on my ESP8266 firmware, which:
- Led to diagnosing some TLS interaction issues with the firmware, and:
- I had an interlude into some interrupt affinity issues, but:
- I finally got there.
The desire for a faster connection
When I migrated my home connection to FTTP I kept the same 80M/20M profile I’d had on FTTC. I didn’t have a pressing need for faster, and I saved money because I was no longer paying for the phone line portion. I wanted more, but at the time I think the only option was for a 160M/30M profile instead and I didn’t need it and it wasn’t enough better to convince me.
Time passed and BT rolled out their GigE (really 900M) download option. And again, I didn’t need it, but I wanted it. My provider, Aquiss, initially didn’t offer this (I think they had up to 330M download options available by this point). So I stayed on 80M/20M. And the only time I really wanted it to be faster was when pushing off-site backups to rsync.net.
Of course, we’ve had the pandemic, and that’s involved 2 adults working from home with plenty of video calls throughout the day. The 80M/20M connection has proved rock solid for this, so again, I didn’t feel an upgrade was justified. We got a 4K capable TV last year and while the bandwidth usage for 4K streaming is noticeably higher, again the connection can handle it no problem.
At some point last year I noticed Aquiss had added speed options all the way to 900M down. At the end of the year I accepted a new role, which is fully remote, so I had a bit of an acceptance about the fact that I wasn’t going back into an office any time soon. The combination (and the desire for the increased upload speed) finally allowed me to justify the upgrade to myself.
Testing the current setup for bottlenecks
The first thing to do was see whether my internal network could cope with an upgrade. I’m mostly running Cat6 GigE so I wasn’t worried about that side of things. However I’m using an RB3011 as my core router, and while it has some coprocessors for routing acceleration they’re not supported under mainline Linux (and unlikely to be any time soon). So I had to benchmark what it was capable of routing. I run a handful of VLANs within my home network, with stateful firewalling between them, so I felt that would be a good approximation of the maximum speed to the outside world I might be able to get if I had the external connection upgraded. I went for the easy approach and fired up iPerf3 on 2 hosts, both connected via ethernet but on separate networks, so routed through the RB3011. That resulted in slightly more than a 300Mb/s throughput. Ok. I confirmed that I could get 900Mb/s+ on 2 hosts both on the same network, just to be sure there wasn’t some other issue I was missing. Nope, so unsurprisingly the router was the bottleneck.
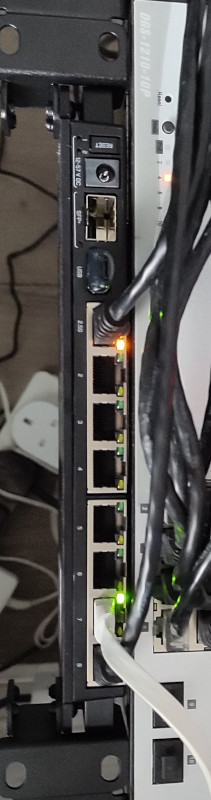
So. To upgrade my internet speed I need to upgrade my router. I could just buy something off the shelf, but I like being able to run Debian (or OpenWRT) on the router rather than some horrible vendor firmware. Lucky MikroTik launched the RB5009 towards the end of last year. RouterOS is probably more than capable, but what really interested me was the fact it’s an ARM64 platform based on an Armada 7040, which is pretty well supported in mainline kernels already. There’s a 10G connection from the internal switch to the CPU, as well as a 2.5Gb/s ethernet port and a 10G SFP+ cage. All good stuff. I ordered one just before the New Year.
Thankfully the OpenWRT folk had done all of the hard work on getting a mainline kernel booting on the device; Sergey Sergeev and Robert Marko in particular fighting RouterBoot and producing a suitable device tree file to get everything up and running. I ended up soldering a serial console connection up to aid debugging, and lightly patching Rob’s u-boot to fix the incorrect RAM size reported by RouterBoot. A few kernel tweaks were necessary to make the networking entirely happy and at that point it was time to think about actually doing a replacement.
Upgrading to Debian 11 (bullseye)
My RB3011 is currently running Debian 10 (buster); an upgrade has been on my todo list, but with the impending replacement I decided I’d hold off and create a new Debian 11 (bullseye) image for the RB5009. Additionally, I don’t actually run off the internal NAND in the RB3011; I have a USB flash drive for the rootfs and just the kernel booting off internal NAND. Originally this was for ease of testing, then a combination of needing to figure out a good read-only root solution and a small enough image to fit in the 120M available. For the upgrade I decided to finally look at these pieces. I’ve ended up with a script that will build me a squashfs image, and the initial rootfs takes care of mounting this and then a tmpfs as an overlay fs. That means I can easily see what pieces are being written to. The RB5009 has a total of 1G NAND so I’m not as space constrained, but the squashfs ends up under 50M. I’ve added some additional pieces to allow me to pre-populate the overlay fs with updates rather than always needing to rebuild the squashfs image.
With that done I decided to try it out on the RB3011; I tweaked the build script to be able to build for armhf (the RB3011) or arm64 (the RB5009) and to deal with some slight differences in configuration between the two (e.g. interface naming). The idea here was to ensure I’d got all the appropriate configuration sorted for the RB5009, in the known-good existing environment. Everything is still on a USB stick at this stage and the new device has an armhf busybox root meaning it can be used on either device, and the init script detects the architecture to select the appropriate squashfs to mount.
A problem with ESP8266 home automation devices
Everything seemed to work fine - a few niggles with the watchdog, which is overly sensitive on the RB3011, but I got those sorted (and the build script updated) and the device came up and successfully did the PPPoE dance to bring up external connectivity. And then I noticed that my home automation devices were having problems connecting to the mosquitto MQTT server. It turned out it was only the ESP8266 based devices that were failing, and examining the serial debug output on one of my test devices revealed it was hitting an out of memory issue (displaying E:M 280) when establishing the TLS MQTT connection.
I rolled back to the Debian 10 image and set about creating a test environment to look at the ESP8266 issues. My first action was to try and reduce my RAM footprint to try and ensure there was enough spare to establish the connection. I moved a few functions that were still sitting in IRAM into flash. I cleaned up a couple of buffers that are on the stack to be more correctly sized. I tried my new image, and I didn’t get the memory issue. Instead I progressed a bit further and got a watchdog reset. Doh!
It was obviously something related to the TLS connection, but I couldn’t easily see what the difference was; the same x509 cert was in use, it looked like the initial handshake was the same (and trying with openssl s_client looked pretty similar too). I set about instrumenting the ancient Mbed TLS used in the Espressif SDK and discovered that whatever had changed between buster + bullseye meant the EPS8266 was now trying a TLS-DHE-RSA-WITH-AES-256-CBC-SHA256 handshake instead of a TLS-RSA-WITH-AES-256-CBC-SHA256 handshake and that was causing enough extra CPU usage that it couldn’t complete in time and the watchdog kicked in. So I commented out MBEDTLS_KEY_EXCHANGE_DHE_RSA_ENABLED in the config_esp.h for mbedtls and rebuilt things. Hacky, but I’ll go back to trying to improve this generally at some point.
A detour into interrupt load
Now, my testing of the RB3011 image is generally done at weekends, when I have enough time to tear down and rebuild the connection rather than doing it in the evening and having limited time to get things working again in time for work in the morning. So at the point I had an image ready to go I pulled the trigger on the line upgrade. I went with the 500M/75M option rather than the full 900M - I suspect I’d have difficulty actually getting that most of the time and 75M of upload bandwidth seems fairly substantial for now. It only took a couple of days from the order to the point the line was regraded (which involved no real downtime - just a reconnection in the night). Of course this happened just after the weekend I’d discovered the ESP8266 issue.
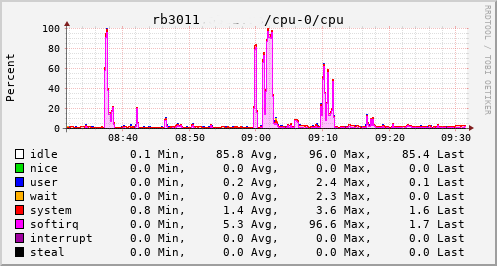
This provided an opportunity to see just what the RB3011 could actually manage. In the configuration I had it turned out to be not much more than the 80Mb/s speeds I had previously seen. The upload jumped from a solid 20Mb/s to 75Mb/s, so I knew the regrade had actually happened. Looking at CPU utilisation clearly showed the problem; softirqs were using almost 100% of a CPU core.
Now, the way the hardware is setup on the RB3011 is that there are two separate 5 port switches, each connected back to the CPU via a separate GigE interface. For various reasons I had everything on a single switch, which meant that all traffic was boomeranging in and out of the same CPU interface. The IPQ8064 has dual cores, so I thought I’d try moving the external connection to the other switch. That puts it on its own GigE CPU interface, which then allows binding the interrupts to a different CPU core. That helps; throughput to the outside world hits 140Mb/s+. Still a long way from the expected max, but proof we just need more grunt.
Success
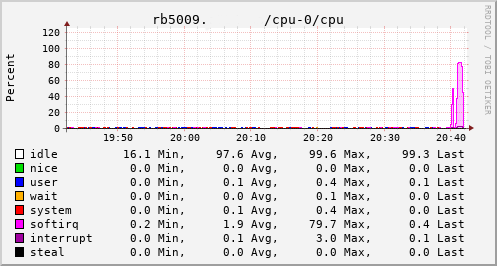
Which brings us to this past weekend, when, having worked out all the other bits, I tried the squashfs root image again on the RB3011. Success! The home automation bits connected to it, the link to the outside world came up, everything seemed happy. So I double checked my bootloader bits on the RB5009, brought it down to the comms room and plugged it in instead. And, modulo my failing to update the nftables config to allow it to do forwarding, it all came up ok. Some testing with iperf3 internally got a nice 912Mb/s sustained between subnets, and some less scientific testing with wget + speedtest-cli saw speeds of over 460Mb/s to the outside world.
Time from ordering the router until it was in service? Just under 8 weeks…
subscribe via RSS