DeskPi Pro + 8GB Pi 4
Despite having worked on a number of ARM platforms I’ve never actually had an ARM based development box at home. I have a Raspberry Pi B Classic (the original 256MB rev 0002 variant) a coworker gave me some years ago, but it’s not what you’d choose for a build machine and generally gets used as a self contained TFTP/console server for hooking up to devices under test. Mostly I’ve been able to do kernel development with the cross compilers already built as part of Debian, and either use pre-built images or Debian directly when I need userland pieces. At a previous job I had a Marvell MACCHIATObin available to me, which works out as a nice platform - quad core A72 @ 2GHz with 16GB RAM, proper SATA and a PCIe slot. However they’re still a bit pricey for a casual home machine. I really like the look of the HoneyComb LX2 - 16 A72 cores, up to 64GB RAM - but it’s even more expensive.
So when I saw the existence of the 8GB Raspberry Pi 4 I was interested. Firstly, the Pi 4 is a proper 64 bit device (my existing Pi B is ARMv6 which means it needs to run Raspbian instead of native Debian armhf), capable of running an upstream kernel and unmodified Debian userspace. Secondly the Pi 4 has a USB 3 controller sitting on a PCIe bus rather than just the limited SoC USB 2 controller. It’s not SATA, but it’s still a fairly decent method of attaching some storage that’s faster/more reliable than an SD card. Finally 8GB RAM is starting to get to a decent amount - for a headless build box 4GB is probably generally enough, but I wanted some headroom.
The Pi comes as a bare board, so I needed a case. Ideally I wanted something self contained that could take the Pi, provide a USB/SATA adaptor and take the drive too. I came across the pre-order for the DeskPi Pro, decided it was the sort of thing I was after, and ordered one towards the end of September. It finally arrived at the start of December, at which point I got round to ordering a Pi 4 from CPC.
Total cost ~ £120 for the case + Pi.
The Bad
First, let’s get the bad parts out of the way.

I managed to break a USB port on the Desk Pi. It has a pair of forward facing ports, I plugged my wireless keyboard dongle into it and when trying to remove it the solid spacer bit in the socket broke off. I’ve never had this happen to me before and I’ve been using USB devices for 20 years, so I’m putting the blame on a shoddy socket.
The first drive I tried was an old Crucial M500 mSATA device. I have an adaptor that makes it look like a normal 2.5” drive so I used that. Unfortunately it resulted in a boot loop; the Pi would boot its initial firmware, try to talk to the drive and then reboot before even loading Linux. The DeskPi Pro comes with an m2 adaptor and I had a spare m2 drive, so I tried that and it all worked fine. This might just be power issues, but it was an unfortunate experience especially after the USB port had broken off.
(Given I ended up using an M.2 drive another case option would have been the Argon ONE M.2, which is a bit more compact.)
The Annoying
The case is a little snug; I was worried I was going to damage things as I slid it in. Additionally the construction process is a little involved. There’s a good set of instructions, but there are a lot of pieces and screws involved. This includes a couple of FFC cables to join things up. I think this is because they’ve attempted to make a compact case rather than allowing a little extra room, and it does have the advantage that once assembled it feels robust without anything loose in it.
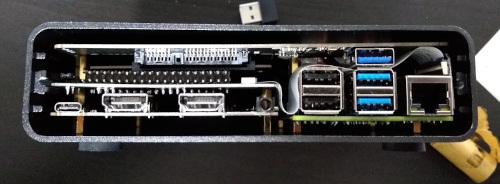
I hate the need for an external USB3 dongle to bridge from the Pi to the USB/SATA adaptor. All the cases I’ve seen with an internal drive bay have to do this, because the USB3 isn’t brought out internally by the Pi, but it just looks ugly to me. It’s hidden at the back, but meh.
Fan control is via a USB/serial device, which is fine, but it attaches to the USB C power port which defaults to being a USB peripheral. Raspbian based kernels support device tree overlays which allows easy reconfiguration to host mode, but for a Debian based system I ended up rolling my own dtb file. I changed
#include "bcm283x-rpi-usb-peripheral.dtsi"
to
#include "bcm283x-rpi-usb-host.dtsi"
in arch/arm/boot/dts/bcm2711-rpi-4-b.dts and then I did:
cpp -nostdinc -I include -I arch -undef -x assembler-with-cpp \
    arch/arm/boot/dts/bcm2711-rpi-4-b.dts > rpi4.preprocessed
dtc -I dts -O dtb rpi4.preprocessed -o bcm2711-rpi-4-b.dtb
and the resulting bcm2711-rpi-4-b.dtb file replaced the one in /boot/firmware. This isn’t a necessary step if you don’t want to use the cooling fan in the case, or the front USB ports, and it’s not really anyone’s fault, but it was an annoying extra step to have to figure out.
The DeskPi came with a microSD card that was supposed to have RaspiOS already on it. It didn’t, it was blank. In my case that was fine, because I wanted to use Debian, but it was a minor niggle.
The Good
I used Gunnar’s pre-built Pi Debian image and it Just Worked; I dd’d it to the microSD as instructed and the Pi 4 came up with working wifi, video and USB enabling me to get it configured for my network. I did an apt upgrade and got updated to the Buster 10.7 release, as well as the latest 5.9 backport kernel, and everything came back without effort after a reboot. It’s lovely to be able to run Debian on this device without having to futz around with self-compiled kernels.
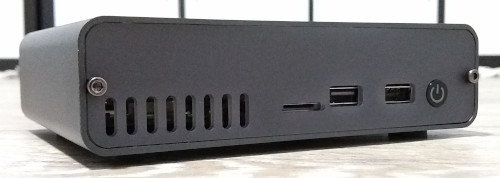
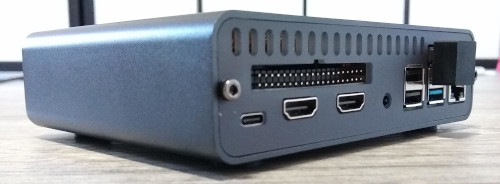
The DeskPi makes a lot of effort to route things externally. The SD slot is brought out to the front, making it easy to fiddle with the card contents without having to open the case to replace it. All the important ports are brought out to the back either through orientation of the Pi, or extenders in the case. That means the built in Pi USB ports, the HDMI sockets (conveniently converted to full size internally), an audio jack and a USB-C power port. The aforementioned USB3 dongle for the bridge to the drive is the only external thing that’s annoying.
Thermally things seem good too. I haven’t done a full torture test yet, but with the fan off the system is sitting at about 40°C while fairly idle. Some loops in bash that push load up to above 2 get the temperature up to 46°C or so, and turning the fan on brings it down to 40°C again. It’s audible, but quieter than my laptop and not annoying.
I liked the way the case came with everything I needed other than the Pi 4 and a suitable disk drive. There was an included PSU (a proper USB-C PD device, UK plug), the heatsink/fan is there, the USB/SATA converter is there and even an SD card is provided (though that’s just because I had a pre-order).
Speaking of the SD, I only needed it for initial setup. Recent Pi 4 bootloaders are capable of booting directly from USB mass storage devices. So I upgraded using the RPi EEPROM Recovery image (which just needs extracted to the SD FAT partition, no need for anything complicated - boot with it and the screen goes all green and you know it’s ok), then created a FAT partition at the start of the drive for the kernel / bootloader config and a regular EXT4 partition for root. Copies everything over, updated paths, took out the SD and it all just works happily.
Summary
My main complaint is the broken USB port, which feels like the result of a cheap connector. For a front facing port expected to see more use than the rear ports I think there’s a reasonable expectation of robustness. However I’m an early adopter and maybe future runs will be better.
Other than that I’m pretty happy. The case is exactly the sort of thing I wanted; I was looking for something that would turn the Pi into a box that can sit on my desk on the network and that I don’t have to worry about knocking wires out of or lots of cables hooking bits up. Everything being included made it very convenient to get up and running. I still haven’t poked the Pi that hard, but first impressions are looking good for it being a trouble free ARM64 dev box in the corner, until I can justify a HoneyComb.