A beginner tries PCB assembly
I wrote last year about my experience with making my first PCB using JLCPCB. I’ve now got 5 of the boards in production around my house, and another couple assembled on my desk for testing. I also did a much simpler board to mount a GPS module on my MapleBoard - basically just with a suitable DIP connector and mount point for the GPS module. At that point I ended up having to pay for shipping; not being in a hurry I went for the cheapest option which mean the total process took 2 weeks from order until it arrived. Still not bad for under $8!
Just before Christmas I discovered that JLCPCB had expanded their SMT assembly option to beyond the Chinese market, and were offering coupons off (but even without that had much, much lower assembly/setup fees than anywhere else I’d seen). Despite being part of LCSC the parts library can be a bit limited (partly it seems there’s nothing complex to assemble such as connectors), with a set of “basic” components without setup fee and then “extended” options which have a $3 setup fee (because they’re not permanently loaded, AIUI).
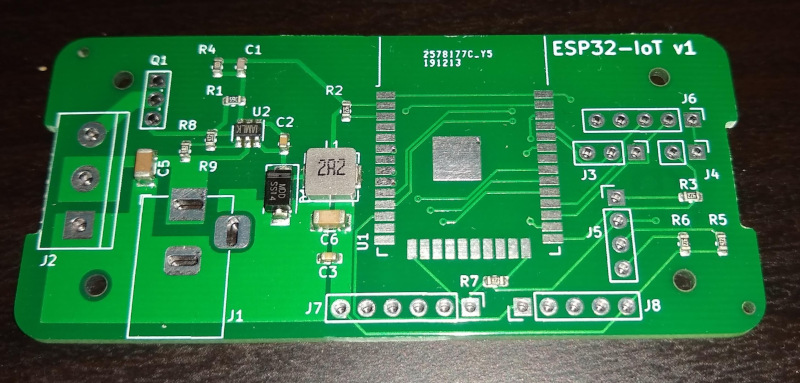
To test out the service I decided to revise my IoT board. First, I’ve used a few for 12V LED strip control which has meant the 3.3V LDO is working harder than ideal, so I wanted to switch (ha ha) to a buck converter. I worked back from the JLCPCB basic parts list and chose an MP2451, which had a handy data sheet with an example implementation. I also upgraded the ESP module to an ESP32-WROOM - I’ve had some issues with non-flickery PWM on the ESP8266 and the ESP32 has hardware PWM. I also have some applications the Bluetooth would be useful for. Once again I turned to KiCad to draw the schematic and lay out the board. I kept the same form factor for ease, as I knew I could get a case for it. The more complex circuitry was a bit harder to lay out in the same space, and the assembly has a limitation of being single sided which complicates things further, but the fact it was being done for me meant I could drop to 0603 parts.
All-in-all I ended up with 17 parts for the board assembly, with the ESP32 module and power connectors being my responsibility (JLCPCB only have the basic ESP32 chip and I did not feel like trying to design a PCB antenna). I managed to get everything except the inductor from the basic library, which kept costs down. Total cost for 10 boards, parts, assembly, shipping + customs fees was just under $29 which is amazing value to me. What’s even better is that the DFM (design for manufacturing) checks they did realised I’d placed the MP2451 the wrong way round and they automatically rotated it 180° for me. Phew!
The order was placed in the middle of December and arrived just before New Year - again, about 2 weeks total time end to end. Very impressive. Soldering the ESP32 module on was more fiddly than the ESP-07, but it all worked first time with both 5V + 12V power supplies, so I’m very pleased with the results.
Being able to do cheap PCB assembly is a game changer for me. There are various things I feel confident enough to design for my own use that I’d never be able to solder up myself; and for these prices it’s well worth a try. I find myself currently looking at some of the basic STM32 offerings (many of them in JLCPCB’s basic component range) and pondering building a slightly more advanced dev board around one. I’m sure my PCB design will cause those I know in the industry to shudder, but don’t worry, I’ve no plans to do this other than for my own amusement!