Controlling the Energenie 433MHz mains switch with an ATTiny
My first attempt at home automation involved a dark internal staircase in my flat, a set of white LED fairy lights and a plan to make them switch on when I was at home and the sun had set. I purchased a set of Energenie sockets and the associated Pi-Mote to control the lights and looked at what my control options were. Nothing really stood out so I started writing some Python that would watch for my phone being connected to the wifi, look at whether the sun had set and send the appropriate commands. Unfortunately the range on the Energenie sockets and/or the Pi-mote ended up too poor to work from where the Pi was located to the socket out in the hallway. I tried soldered an antenna onto the Pi-mote, but it still ended up too unreliable. Subsequently something happened to the Pi-mote and it stopped working entirely. The sockets were still working ok, and for a while I made some use of them with the provided remote control, but until recently they had been sitting in a box for a couple of years.
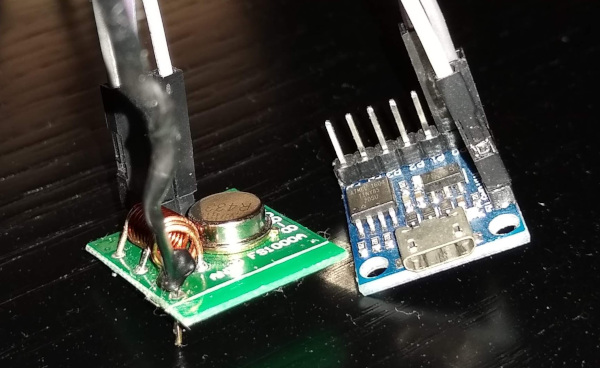
With my more recent, more successful foray into automation I decided to try and revive the Energenie sockets as part of my setup. Poking the Pi-mote confirmed it was dead - trying to drive it manually rather than with the Pi resulted in no output signal. However I’d purchased a cheap 433MHz receiver/transmitter pair (MX-RM-5V + FS1000A) - very cheap and nasty, but easy to poke. I found a good writeup of the Energenie protocol and how to drive it via FT232R bitbanging and Glen Pitt-Pladdy also had some details. Using PulseView and my cheap Cypress FX2 analyser hooked up to the MX-RM-5V I was able to capture the 20 digit code from my remote control.
All that remained was to try and transmit the code + appropriate power on/off commands for each of my 4 sockets. I still have spare Digispark clones, so that seemed like a good starting point. My initial first steps with ATTinys involved a relay board which was available with up to 8 ports. It made sense to try and emulate a 4 port relay board on a device that would actually send out the appropriate 433MHz signals. In addition the relay boards have 5 digits of configurable serial number - perfect for a 20 bit ID code! I took my existing code and fixed it up so that instead of setting/clearing the appropriate output pin bit it wiggled a single pin, connected to the FS1000A, in the appropriate manner for the Energenie. It took a little bit of twiddling, and I had to solder an antenna onto the FS1000A to get better range, but I’ve ended up with 2 sockets in the same room as the Digispark/transmitter dongle, and another in the next room on just the other side of the wall.
For initial testing I used Darryl Bond’s usbrelay, which is handy because it also supports setting the serial number, so I didn’t have to hard code anything into my image. Ultimately I wrote my own code to control the device in Python, and of course hooked it into my MQTT setup. This tied it into Home Assistant like any other set of MQTT lights, and ultimately into Alexa.
Ultimately the SonOff is better technically - the use of an ESP8266 directly on the device means you get a direct secure MQTT/TLS connection rather than an easily sniffable/clonable 433MHz signal, plus it’s bidirectional so you can be sure the device is in the state you think it is. However I had these switches lying around and a spare Digispark so the only expenditure was a couple of quid for the transmitter/receiver pair. Plus it was fun to figure it out and end up with a useful result, and some of the information learned will be useful for controlling my heating (which is on a 433MHz thermostat).
The code is locally and on GitHub in case it’s of use/interest to anyone else.
DebConf18 writeup
I’m just back from DebConf18, which was held in Hsinchu, Taiwan. I went without any real concrete plans about what I wanted to work on - I had some options if I found myself at a loose end, but no preconceptions about what would pan out. In the end I felt I had a very productive conference and I did bits on all of the following:
- Worked on trying to fix my corrupted Lenovo Ideacentre Stick 300 BIOS (testing of current attempt has been waiting until I’m back home and have access to the device again, so hopefully within the next few days)
- NMUed sdcc to fix FTBFS with GCC 8
- Prepared Pulseview upload to fix FTBFS with GCC 8, upload stalled on libsigc++2.0 (Bug#897895)
- Caught up with Gunnar re keyring stuff
- Convinced John Sullivan to come and help out keyring-maint
- New Member / Front Desk conversations
- Worked on gcc toolchain packages for ESP8266 (xtensa-lx106) (Bug#868895). Not sure if these are useful enough to others to upload or not, but so far I’ve moved from 4.8.5 to 7.3 and things seem happy.
- Worked on porting latest newlib to xtensa with help from Keith Packard (in particular his nano variant with much smaller stdio code)
- Helped present the state of Debian + the GDPR
- Sat on the New Members BoF panel
- Went to a whole bunch of interesting talks + BoFs.
- Put faces to a number of names, as well as doing the usual catchup with the familiar faces.
I managed to catch the DebConf bug towards the end of the conference, which was unfortunate - I had been eating the venue food at the start of the week and it would have been nice to explore the options in Hsinchu itself for dinner, but a dodgy tummy makes that an unwise idea. Thanks to Stuart Prescott I squeezed in a short daytrip to Taipei yesterday as my flight was in the evening and I was going to have to miss all the closing sessions anyway. So at least I didn’t completely avoid seeing some of Taiwan when I was there.
As usual thanks to all the organisers for their hard work, and looking forward to DebConf19 in Curitiba, Brazil!
(Badly) cloning a TEMPer USB
Having setup a central MQTT broker I’ve wanted to feed it extra data. The study temperature was a start, but not the most useful piece of data when working towards controlling the central heating. As it happens I have a machine in the living room hooked up to the TV, so I thought about buying something like a TEMPer USB so I could sample the room temperature and add it as a data source. And then I realised that I still had a bunch of Digispark clones and some Maxim DS18B20 1-Wire temperature sensors and I should build something instead.
I decided to try and emulate the TEMPer device rather than doing something unique. V-USB was pressed into service and some furious Googling took place to try and find out the details of how the TEMPer appears to the host in order to craft the appropriate USB/HID descriptors to present - actually finding some lsusb output was the hardest part. Looking at the code of various tools designed to talk to the device provided details of the different init commands that needed to be recognised and a basic skeleton framework (reporting a constant 15°C temperature) was crafted. Once that was working with the existing client code knocking up some 1-Wire code to query the DS18B20 wasn’t too much effort (I seem to keep implementing this code on various devices).
At this point things became less reliable. The V-USB code is an evil (and very clever) set of interrupt driven GPIO bit banging routines, working around the fact that the ATTiny doesn’t have a USB port. 1-Wire is a timed protocol, so the simple implementation involves a bunch of delays. To add to this the temper-python library decides to do a USB device reset if it sees a timeout. And does a double read to work around some behaviour of the real hardware. Doing a 1-Wire transaction directly in response to these requests causes lots of problems, so I implemented a timer to do a 1-Wire temperature check once every 10 seconds, and then the request from the host just returns the last value read. This is a lot more reliable, but still sees a few resets a day. It would be nice to fix this, but for the moment it’s good enough for my needs - I’m reading temperature once a minute to report back to the MQTT server, but it offends me to see the USB resets in the kernel log.
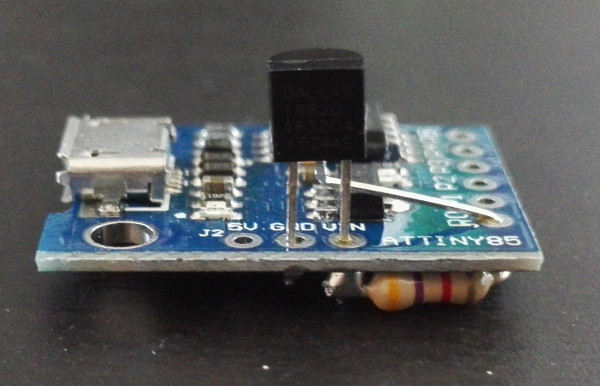
Additionally I had some problems with accuracy. Firstly it seems the batch of DS18B20s I have can vary by 1-2°C, so I ended up adjusting for this in the code that runs on the host. Secondly I mounted the DS18B20 on the Digispark board, as in the picture. The USB cable ensures it’s far enough away from the host (rather than sitting plugged directly into the back of the machine and measuring the PSU fan output temperature), but the LED on the board turned out to be close enough that it affected the reading. I have no need for it so I just ended up removing it.
The code is locally and on GitHub in case it’s of use/interest to anyone else.
(I’m currently at DebConf18 but I’ll wait until it’s over before I write it up, and I’ve been meaning to blog about this for a while anyway.)
Fixing a broken ESP8266
One of the IoT platforms I’ve been playing with is the ESP8266, which is a pretty incredible little chip with dev boards available for under £4. Arduino and Micropython are both great development platforms for them, but the first board I bought (back in 2016) only had a 4Mbit flash chip. As a result I spent some time writing against the Espressif C SDK and trying to fit everything into less than 256KB so that the flash could hold 2 images and allow over the air updates. Annoyingly just as I was getting to the point of success with Richard Burton’s rBoot my device started misbehaving, even when I went back to the default boot loader:
 ets Jan  8 2013,rst cause:1, boot mode:(3,6)

load 0x40100000, len 816, room 16
tail 0
chksum 0x8d
load 0x3ffe8000, len 788, room 8
tail 12
chksum 0xcf
ho 0 tail 12 room 4
load 0x3ffe8314, len 288, room 12
tail 4
chksum 0xcf
csum 0xcf

2nd boot version : 1.2
  SPI Speed      : 40MHz
  SPI Mode       : DIO
  SPI Flash Size : 4Mbit
jump to run user1

Fatal exception (0):
epc1=0x402015a4, epc2=0x00000000, epc3=0x00000000, excvaddr=0x00000000, depc=0x00000000
Fatal exception (0):
epc1=0x402015a4, epc2=0x00000000, epc3=0x00000000, excvaddr=0x00000000, depc=0x00000000
Fatal exception (0):
(repeats indefinitely)
Various things suggested this was a bad flash. I tried a clean Micropython install, a restore of the original AT firmware backup I’d taken, and lots of different combinations of my own code/the blinkenlights demo and rBoot/Espressif’s bootloader. I made sure my 3.3v supply had enough oompf (I’d previously been cheating and using the built in FT232RL regulator, which doesn’t have quite enough when the device is fully operational, rather than in UART boot mode, such as doing an OTA flash). No joy. I gave up and moved on to one of the other ESP8266 modules I had, with a greater amount of flash. However I was curious about whether this was simply a case of the flash chip wearing out (various sites claim the cheap ones on some dev boards will die after a fairly small number of programming cycles). So I ordered some 16Mb devices - cheap enough to make it worth trying out, but also giving a useful bump in space.
They arrived this week and I set about removing the old chip and soldering on the new one (Andreas Spiess has a useful video of this, or there’s Pete Scargill’s write up). Powered it all up, ran esptool.py flash_id to see that it was correctly detected as a 16Mb/2MB device and set about flashing my app onto it. Only to get:
 ets Jan  8 2013,rst cause:2, boot mode:(3,3)

load 0x40100000, len 612, room 16
tail 4
chksum 0xfd
load 0x88380000, len 565951362, room 4
flash read err, ets_unpack_flash_code
ets_main.c
Ooops. I had better luck with a complete flash erase (esptool.py erase_flash) and then a full program of Micropython using esptool.py --baud 460800 write_flash --flash_size=detect -fm dio 0 esp8266-20180511-v1.9.4.bin, which at least convinced me I’d managed to solder the new chip on correctly. Further experimention revealed I needed to pass all of the flash parameters to esptool.py to get rBoot entirely happy, and include esp_init_data_default.bin (FWIW I updated everything to v2.2.1 as part of the process):
esptool.py write_flash --flash_size=16m -fm dio 0x0 rboot.bin 0x2000 rom0.bin \
    0x120000 rom1.bin 0x1fc000 esp_init_data_default_v08.bin
Which gives (at the default 76200 of the bootloader bit):
 ets Jan  8 2013,rst cause:1, boot mode:(3,7)

load 0x40100000, len 1328, room 16
tail 0
chksum 0x12
load 0x3ffe8000, len 604, room 8
tail 4
chksum 0x34
csum 0x34

rBoot v1.4.2 - richardaburton@gmail.com
Flash Size:   16 Mbit
Flash Mode:   DIO
Flash Speed:  40 MHz

Booting rom 0.
rf cal sector: 507
freq trace enable 0
rf[112]
Given the cost of the modules it wasn’t really worth my time and energy to actually fix the broken one rather than buying a new one, but it was rewarding to be sure of the root cause. Hopefully this post at least serves to help anyone seeing the same exception messages determine that there’s a good chance their flash has died, and that a replacement may sort the problem.
Thoughts on the acquisition of GitHub by Microsoft
Back at the start of 2010, I attended linux.conf.au in Wellington. One of the events I attended was sponsored by GitHub, who bought me beer in a fine Wellington bar (that was very proud of having an almost complete collection of BrewDog beers, including some Tactical Nuclear Penguin). I proceeded to tell them that I really didn’t understand their business model and that one of the great things about git was the very fact it was decentralised and we didn’t need to host things in one place any more. I don’t think they were offended, and the announcement Microsoft are acquiring GitHub for $7.5 billion proves that they had a much better idea about this stuff than me.
The acquisition announcement seems to have caused an exodus. GitLab reported over 13,000 projects being migrated in a single hour. IRC and Twitter were full of people throwing up their hands and saying it was terrible. Why is this? The fear factor seemed to come from was who was doing the acquiring. Microsoft. The big, bad Linux is a cancer folk. I saw a similar, though more muted, reaction when LinkedIn were acquired.
This extremely negative reaction to Microsoft seems bizarre to me these days. I’m well aware of their past, and their anti-competitive practises (dating back to MS-DOS vs DR-DOS). I’ve no doubt their current embrace of Free Software is ultimately driven by business decisions rather than a sudden fit of altruism. But I do think their current behaviour is something we could never have foreseen 15+ years ago. Did you ever think Microsoft would be a contributor to the Linux kernel? Is it fair to maintain such animosity? Not for me to say, I guess, but I think that some of it is that both GitHub and LinkedIn were services that people were already uneasy about using, and the acquisition was the straw that broke the camel’s back.
What are the issues with GitHub? I previously wrote about the GitHub TOS changes, stating I didn’t think it was necessary to fear the TOS changes, but that the centralised nature of the service was potentially something to be wary of. joeyh talked about this as long ago as 2011, discussing the aspects of the service other than the source code hosting that were only API accessible, or in some other way more restricted than a git clone away. It’s fair criticism; the extra features offered by GitHub are very much tied to their service. And yet I don’t recall the same complaints about SourceForge, long the home of choice for Free Software projects. Its problems seem to be more around a dated interface, being slow to enable distributed VCSes and the addition of advertising. People left because there were much better options, not because of idiological differences.
Let’s look at the advantages GitHub had (and still has) to offer. I held off on setting up a GitHub account for a long time. I didn’t see the need; I self-hosted my Git repositories. I had the ability to setup mailing lists if I needed them (and my projects generally aren’t popular enough that they did). But I succumbed in 2015. Why? I think it was probably as part of helping to run an OpenHatch workshop, trying to get people involved in Free software. That may sound ironic, but helping out with those workshops helped show me the benefit of the workflow GitHub offers. The whole fork / branch / work / submit a pull request approach really helps lower the barrier to entry for people getting started out. Suddenly fixing an annoying spelling mistake isn’t a huge thing; it’s easy to work in your own private playground and then make that work available to upstream and to anyone else who might be interested.
For small projects without active mailing lists that’s huge. Even for big projects that can be a huge win. And it’s not just useful to new contributors. It lowers the barrier for me to be a patch ‘n run contributor. Now that’s not necessarily appealing to some projects, because they’d rather get community involvement. And I get that, but I just don’t have the time to be active in all the projects I feel I can offer something to. Part of that ease is the power of git, the fact that a clone is a first class repo, capable of standing alone or being merged back into the parent. But another part is the interface GitHub created, and they should get some credit for that. It’s one of those things that once you’re presented with it it makes sense, but no one had done it quite as slickly up to that point. Submissions via mailing lists are much more likely to get lost in the archives compared to being able to see a list of all outstanding pull requests on GitHub, and the associated discussion. And subscribe only to that discussion rather than everything.
GitHub also seemed to appear at the right time. It, like SourceForge, enabled easy discovery of projects. Crucially it did this at a point when web frameworks were taking off and a whole range of developers who had not previously pull large chunks of code from other projects were suddenly doing so. And writing frameworks or plugins themselves and feeling in the mood to share them. GitHub has somehow managed to hit critical mass such that lots of code that I’m sure would have otherwise never seen the light of day are available to all. Perhaps the key was that repos were lightweight setups under usernames, unlike the heavier SourceForge approach of needing a complete project setup per codebase you wanted to push. Although it’s not my primary platform I engage with GitHub for my own code because the barrier is low; it’s couple of clicks on the website and then I just push to it like my other remote repos.
I seem to be coming across as a bit of a GitHub apologist here, which isn’t my intention. I just think the knee-jerk anti GitHub reaction has been fascinating to observe. I signed up to GitLab around the same time as GitHub, but I’m not under any illusions that their hosted service is significantly different from GitHub in terms of having my data hosted by a third party. Nothing that’s up on either site is only up there, and everything that is is publicly available anyway. I understand that as third parties they can change my access at any point in time, and so I haven’t built any infrastructure that assumes their continued existence. That said, why would I not take advantage of their facilities when they happen to be of use to me?
I don’t expect my use of GitHub to significantly change now they’ve been acquired.
subscribe via RSS