Ada Lovelace Day: 5 Amazing Women in Tech

It’s Ada Lovelace day and I’ve been lax in previous years about celebrating some of the talented women in technology I know or follow on the interwebs. So, to make up for it, here are 5 amazing technologists.
I was initially aware of Allison through her work on Perl, was vaguely aware of the fact she was working on Ubunutu, briefly overlapped with her at HPE (and thought it was impressive HP were hiring such high calibre of Free Software folk) when she was working on OpenStack, and have had the pleasure of meeting her in person due to the fact we both work on Debian. In the continuing theme of being able to do all things tech she’s currently studying a PhD at Cambridge (the real one), and has already written a fascinating paper about about the security misconceptions around virtual machines and containers. She’s also been doing things with home automation, properly, with local speech recognition rather than relying on any external assistant service (I will, eventually, find the time to follow her advice and try this out for myself).
Graphics are one of the many things I just can’t do. I’m not artistic and I’m in awe of anyone who is capable of wrangling bits to make computers do graphical magic. People who can reverse engineer graphics hardware that would otherwise only be supported by icky binary blobs impress me even more. Alyssa is such a person, working on the Panfrost driver for ARM’s Mali Midgard + Bifrost GPUs. The lack of a Free driver stack for this hardware is a real problem for the ARM ecosystem and she has been tirelessly working to bring this to many ARM based platforms. I was delighted when I saw one of my favourite Free Software consultancies, Collabora, had given her an internship over the summer. (Selfishly I’m hoping it means the Gemini PDA will eventually be able to run an upstream kernel with accelerated graphics.)
The first time I saw Angie talk it was about the user experience of Virtual Reality, and how it had an entirely different set of guidelines to conventional user interfaces. In particular the premise of not trying to shock or surprise the user while they’re in what can be a very immersive environment. Obvious once someone explains it to you! Turns out she was also involved in the early days of custom PC builds and internet cafes in Northern Ireland, and has interesting stories to tell. These days she’s concentrating on cyber security - I’ve her to thank for convincing me to persevere with Ghidra - having looked at Bluetooth security as part of her Masters. She’s also deeply aware of the implications of the GDPR and has done some interesting work on thinking about how it affects the computer gaming industry - both from the perspective of the author, and the player.
I’m not particularly fond of modern web design. That’s unfair of me, but web designers seem happy to load megabytes of Javascript from all over the internet just to display the most basic of holding pages. Indeed it seems that such things now require all the includes rather than being simply a matter of HTML, CSS and some graphics, all from the same server. Claire talked at Women Techmakers Belfast about moving away from all of this bloat and back to a minimalistic approach with improved performance, responsiveness and usability, without sacrificing functionality or presentation. She said all the things I want to say to web designers, but from a position of authority, being a front end developer as her day job. It’s great to see someone passionate about front-end development who wants to do things the right way, and talks about it in a way that even people without direct experience of the technologies involved (like me) can understand and appreciate.
There aren’t enough people out there who understand law and technology well. Karen is one of the few I’ve encountered who do, and not only that, but really, really gets Free software and the impact of the four freedoms on users in a way many pure technologists do not. She’s had a successful legal career that’s transitioned into being the general counsel for the Software Freedom Law Center, been the executive director of GNOME and is now the executive director of the Software Freedom Conservancy. As someone who likes to think he knows a little bit about law and technology I found Karen’s wealth of knowledge and eloquence slightly intimidating the first time I saw her speak (I think at some event in San Francisco), but I’ve subsequently (gratefully) discovered she has an incredible amount of patience (and ability) when trying to explain the nuances of free software legal issues.
Life with a Yubikey

At the past two DebConfs Thomas Goirand of infomaniak has run a workshop on using a Yubikey, and been generous enough to provide a number of devices for Debian folk. Last year I was fortunate enough to get hold of one of the devices on offer.
My primary use for the device is to hold my PGP key. Generally my OpenPGP hardware token of choice is the Gnuk, which features a completely Free software stack and an open hardware design, but the commonly available devices suffer from being a bit more fragile than I’d like to regularly carry around with me. The Yubikey has a much more robust design, being a slim plastic encapsulated device. I finally set it up properly with my PGP key last November, and while I haven’t attached it to my keyring I’ve been carrying it with me regularly.
Firstly, it’s been perfectly fine from a physical robustness point of view. I don’t worry about it being in my pocket with keys or change, it gets thrown into my bag at the end of the day when I go home, it kicks around my desk and occasionally gets stuff dropped on it. I haven’t tried to break it deliberately and I’m not careless with it, but it’s not treated with kid gloves. And it’s still around nearly a year later. So that’s good.
Secondly, I find my initial expected use case (holding my PGP subkeys and using the auth subkey for SSH access) is the major use I have for the key. I occasionally use the signing subkey for doing Debian uploads, I rarely use the encryption subkey, but I use the auth subkey most days. I’ve also setup U2F for any site I use that supports it, but generally once I’m logged in there on trusted machines I don’t need to regularly re-use it. It’s nice to have though, and something the Gnuk doesn’t offer.
On the down side, I still want a device that requires a physical key press for any signing operation. My preferred use case is leaving the key plugged into the machine to handle SSH logins, but the U2F use case seems to be to insert the key only when needed, and then press the key. OpenPGP operation with the Yubikey doesn’t require a physical touch. I get round some of this by enabling the confirm option with gpg-agent, but I’d still be happier with something on the token itself. The Yubikey also doesn’t do ECC keys, but it does do 4096-bit RSA so it’s not terrible, just results in larger keys than ideal.
Overall I’m happy with the device, and grateful to Thomas and infomaniak for providing me with it, though I’m hopeful about a new version of the Gnuk with a more robust form factor/casing. (If you’re looking for discussion on how to setup the token with GPG subkeys then I recommend Thomas’ presentation from 2018, which covers all the steps required.)
Update: It’s been pointed out to me by several people that the Yubikey can be configured to require a touch for OpenPGP usage; either using ykman or yubitouch.
Making xinput set-button-map permanent
Since 2006 I’ve been buying a Logitech Trackman Marble (or, as Amazon calls it, a USB Marble Mouse) for both my home and work setups (they don’t die, I just seem to lose them somehow). It’s got a solid feel to it, helps me avoid RSI twinges and when I’m thinking I can take the ball out and play with it. It has 4 buttons, but I find the small one on the right inconvenient to use so I treat it as a 3 button device (the lack of scroll wheel functionality doesn’t generally annoy me). Problem is the small left most button defaults to “Back”, rather than “Middle button”. You can fix this with xinput:
xinput set-button-map "Logitech USB Trackball" 1 8 3 4 5 6 7 2 9
but remembering to do that every boot is annoying. I could put it in a script, but a better approach is to drop the following in /usr/share/X11/xorg.conf.d/50-marblemouse.conf (the fact it’s in /usr/share instead of /etc or ~ is what meant it took me so long to figure out how I’d done it on my laptop for my new machine):
Section "InputClass"
    Identifier      "Marble Mouse"
    MatchProduct    "Logitech USB Trackball"
    MatchIsPointer  "on"
    MatchDevicePath "/dev/input/event*"
    Driver          "evdev"
    Option          "SendCoreEvents" "true"

    #  Physical buttons come from the mouse as:
    #     Big:   1 3
    #     Small: 8 9
    #
    # This makes left small button (8) into the middle, and puts
    #  scrolling on the right small button (9).
    #
    Option "Buttons"            "9"
    Option "ButtonMapping"      "1 8 3 4 5 6 7 2 9"
    Option "EmulateWheel"       "true"
    Option "EmulateWheelButton" "9"

EndSection
This post exists solely for the purpose of reminding future me how I did this on my Debian setup (given that it’s taken me way too long to figure out how I did it 2+ years ago) and apparently original credit goes to Ubuntu for their Logitech Marblemouse USB page.
DebConf19: Brazil
My first DebConf was DebConf4, held in Porte Alegre, Brazil back in 2004. Uncle Steve did the majority of the travel arrangements for 6 of us to go. We had some mishaps which we still tease him about, but it was a great experience. So when I learnt DebConf19 was to be in Brazil again, this time in Curitiba, I had to go. So last November I realised flights were only likely to get more expensive, that I’d really kick myself if I didn’t go, and so I booked my tickets. A bunch of life happened in the meantime that mean the timing wasn’t particularly great for me - it’s been a busy 6 months - but going was still the right move.
One thing that struck me about DC19 is that a lot of the faces I’m used to seeing at a DebConf weren’t there. Only myself and Steve from the UK DC4 group made it, for example. I don’t know if that’s due to the travelling distances involved, or just the fact that attendance varies and this happened to be a year where a number of people couldn’t make it. Nonetheless I was able to catch up with a number of people I only really see at DebConfs, as well as getting to hang out with some new folk.
Given how busy I’ve been this year and expect to be for at least the next year I set myself a hard goal of not committing to any additional tasks. That said DebConf often provides a welcome space to concentrate on technical bits. I reviewed and merged dkg’s work on WKD and DANE for the Debian keyring under debian.org - we’re not exposed to the recent keyserver network issues due to the fact the keyring is curated, but providing additional access to our keyring makes sense if it can be done easily. I spent some time with Ian Jackson talking about dgit - I’m not a user of it at present, but I’m intrigued by the potential for being able to do Debian package uploads via signed git tags. Of course I also attended a variety of different talks (and, as usual, at times the schedule conflicted such that I had a difficult choice about which option to chose for a particular slot).
This also marks the first time I did a non-team related talk at DebConf, warbling about my home automation (similar to my NI Dev Conf talk but with some more bits about the Debian involvement thrown in):
In addition I co-presented a couple of talks for teams I’m part of:
I only realised late in the week that 2 talks I’d normally expect to attend, an Software in the Public Interest BoF and a New Member BoF, were not on the schedule, but to be honest I don’t think I’d have been able to run either even if I’d realised in advance.
Finally, DebConf wouldn’t be DebConf without playing with some embedded hardware at some point, and this year it was the Caninos Loucos Labrador. This is a Brazilian grown single board ARM based computer with a modular form factor designed for easy integration into bigger projects. There;s nothing particularly remarkable about the hardware and you might ask why not just use a Pi? The reason is that import duties in Brazil make such things prohibitively expensive - importing a $35 board can end up costing $150 by the time shipping, taxes and customs fees are all taken into account. The intent is to design and build locally, as components can be imported with minimal taxes if the final product is being assembled within Brazil. And Mercosul allows access to many other South American countries without tariffs. I’d have loved to get hold of one of the boards, but they’ve only produced 1000 in the initial run and really need to get them into the hands of people who can help progress the project rather than those who don’t have enough time.
Next year DebConf20 is in Haifa - a city I’ve spent some time in before - but I’ve made the decision not to attend; rather than spending a single 7-10 day chunk away from home I’m going to aim to attend some more local conferences for shorter periods of time.
Upgrading my home server
At the end of last year I decided it was time to upgrade my home server. I built it back in 2013 as an all-in-one device to be my only always-on machine, with some attempt towards low power consumption. It was starting to creak a bit - the motherboard is limited to 16G RAM and the i3-3220T is somewhat ancient (though has served me well). So it was time to think about something more up to date. Additionally since then my needs have changed; my internet connection is VDSL2 (BT Fibre-to-the-Cabinet) so I have an BT HomeHub 5 running OpenWRT to drive that and provide core routing/firewalling. My wifi is provided by a pair of UniFi APs at opposite ends of the house. I also decided I could use something low power to run Kodi and access my ripped DVD collection, rather than having the main machine in the living room. That meant what I wanted was much closer to just a standard server rather than having any special needs.
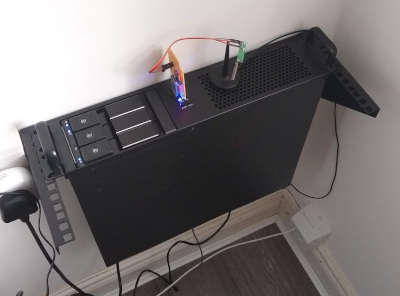
The first thing to consider was a case. My ADSL terminates in what I call the “comms room” - it has the electricity meter / distribution board and gas boiler, as well as being where one of the UniFi’s lives and where the downstairs ethernet terminates. In short it’s the right room for a server to live in. I don’t want a full rack, however, and ideally wanted something that could sit alongside the meter cabinet without protruding from the wall any further. A tower case would have worked, but only if turned sideways, which would have made it a bit awkward to access. I tried in vain to find a wall mount case with side access that was shallow enough, but failed. However in the process I discovered a 4U vertical wall mount. This was about the same depth as the meter cabinet, so an ideal choice. I paired it with a basic 2U case from X-Case, giving me a couple of spare U should I decide I want another rack-mount machine or two.
My old machine has 2 3.5” hotswap drive bays; this has been useful in the past when a drive failed even just to avoid having to take the machine apart. I still wanted to aim for low power consumption, so 2 drives is enough. I started with a pair of cheap 5.25” drive bay to dual 2.5” + 3.5” hotswap bay devices, but the rear SATA connectors ended up being very fragile and breaking off, so I bit the bullet and bought a SilverStone FS303. This takes up 2 5.25” bays and provides 3 x 3.5” hotswap bays. It’s well constructed and the extra bay has already turned out useful when a drive started to fail and I was able to put the replacement in and resync the RAID set before having to remove the old drive.
Now I had the externals sorted I needed to think about what to put inside. The only thing coming from the old machine were the hard disks (a 4T Seagate and a 6T WD RED, 4T of software RAID1 and 2T of unRAIDed backup space), so everything else was up for discussion. I toyed with an Intel i7-8700T - 6 cores in 35W. AMD have a stronger offering these days though and the AMD Ryzen 2700E with 8 cores in 45W seemed like a good option for an extra 10W. Plus on top there are several of the recent speculative execution exploits that don’t seem to affect AMD chips (or more recent Intel CPUs, but they weren’t out at the time in a low power format). Sadly the 2700E proved to be made of unobtanium; I sat with it on backorder for nearly 3 months before giving up and ordering a AMD Ryzen 2700 that was on offer. This is rated at up to 65W, but I considered trying to underclock if necessary or tweak the cpufreq settings at least.
Next up was a motherboard. The 2U case is short, but allows for MicroATX, an improvement over the MiniITX my last case needs. One of the things constraining me with the old machine was that it maxed out at 16G RAM, so I wanted something that would take more. It turns out there are a number of Socket AM4 MicroATX boards that will take 64G over 4 DIMMs. I chose an ASRock B450M Pro4, which had a couple of good reviews and seemed to have all the bits I wanted. It’s been decent so far - including having some interactions with ASRock support when I initially put an AMD 240GE (while waiting for the 2700E that was never coming) in it. I like to think of BIOS 3.10 as mine ;).
For RAM I went with a Corsair CMK32GX4M2A2400C14 Vengeance LPX 32GB (2 x 16GB) set. I’m sure I should care more about RAM but it was decently priced from a vendor I trust. At some point I’ll buy another set to bring the board up to the full 64GB, but for now this is twice what the old machine had.
Finally I decided to splash out on some SSD. The spinning rust is primarily for media (music + video shared out to Kodi etc) and backups, but I wanted to move my containers (home automation, UniFi controller, various others) over to SSD. I talked myself into a pair of Corsair MP510 960GB NVMe M.2 drives. One went on the motherboard slot and I had to buy a low profile PCIe adaptor for the other (of course they’re RAID1ed). They fly; initially I clocked them in at about 1.5GB/s until I realised the one in the add-in card was only using 2 PCIe lanes. Once I rejigged things so it had all 4 it can use I was up to 2.3GB/s. Impressive.
You’ll note I haven’t mentioned a graphic card here. I ended up with a cheap NVidia off eBay to get things going, but this is a server in a comms room and removing the graphics card saves me at least 10W of power (it was also the reason the NVMe drive only had 2 lanes). I couldn’t find an AM4 motherboard that did serial console, but the 450M Pro is happy to boot without a graphics card present, and I have GRUB onward configured to do serial console just in case.
And the power consumption? The previous machine idled at around 50W, getting to maybe 60-65W under load. I’ve cheated with the new machine; because the spinning rust is not generally in use it’s configured to spin down after 20 minutes idle. As a result the machine idles at around 36W. It hits 50W when the drives spin up, so for 8 cores compared to 2 we’re still sitting in the same ballpark. That’s good, because that’s the general case - idle here means Home Assistant operational, the UniFi controller going, the syslog container logging and so on. However the new server peaks considerably higher; if the drives are spun up and I compile a kernel I can hit 120W. However the compilation takes less than a quarter of the time - the machine is significantly faster than the old one, and even without taking advantage of the SSDs idles at roughly the same power level. I’d call that an overall win.
subscribe via RSS