Using QEmu for UEFI/TPM testing
This is one of those posts that’s more for my own reference than likely to be helpful for others. If you’re unlucky it’ll have some useful tips for you. If I’m lucky then I’ll get a bunch of folk pointing out some optimisations.
First, what I’m trying to achieve. I want a virtual machine environment where I can manually do tests on random kernels, and also various TPM related experiments. So I don’t want something as fixed as a libvirt setup. I’d like the following:
- It to be fairly lightweight, so I can run it on a laptop while usefully doing other things
- I need a TPM 2.0 device to appear to the guest OS, but it doesn’t need to be a real TPM
- Block device discard should work, so I can back it with a
qcow2image and use fstrim to keep the actual on disk size small, without constraining my potential for file system expansion should I need it - I’ve no need for graphics, in fact a serial console would be better as it eases copy & paste, especially when I screw up kernel changes
That turns out to be possible, but it took a bunch of trial and error to get there. So I’m writing it down. I generally do this on a Fedora based host system (FC40 at present, but this all worked with FC38 + FC39 too), and I run Debian 12 (bookworm) as the guest. At present I’m using qemu 8.2.2 and swtpm 0.9.0, both from the FC40 packages.
One other issue I spent too long tracking down is that the version of grub 2.06 in bookworm does not manage to pass the TPMEventLog through to the guest kernel properly. The events get measured and the PCRs updated just fine, but /sys/kernel/security/tpm0/binary_bios_measurements doesn’t even get created. Using either grub 2.06 from FC40, or the 2.12 backport in bookworm-backports, makes this work just fine.
Anyway, for reference, the following is the script I use to start the swtpm, and then qemu. The debugcon line can be dropped if you’re not interested in OVMF debug logging. This needs the guest OS to be configured up for a serial console, but avoids the overhead of graphics emulation.
As I said at the start, I’m open to any hints about other options I should be passing; as long as I get acceptable performance in the guest I care more about reducing host load than optimising for the guest.
#!/bin/sh

BASEDIR=/home/noodles/debian-qemu

if [ ! -S ${BASEDIR}/swtpm/swtpm-sock ]; then
    echo Starting swtpm:
    swtpm socket --tpmstate dir=${BASEDIR}/swtpm \
        --tpm2 \
        --ctrl type=unixio,path=${BASEDIR}/swtpm/swtpm-sock &
fi

echo Starting QEMU:
qemu-system-x86_64 -enable-kvm -m 2048 \
    -machine type=q35 \
    -smbios type=1,serial=N00DL35,uuid=fd225315-f72a-4d66-9b16-55363c6c938b \
    -drive if=pflash,format=qcow2,readonly=on,file=/usr/share/edk2/ovmf/OVMF_CODE_4M.qcow2 \
    -drive if=pflash,format=raw,file=${BASEDIR}/OVMF_VARS.fd \
    -global isa-debugcon.iobase=0x402 -debugcon file:${BASEDIR}/debian.ovmf.log \
    -device virtio-blk-pci,drive=drive0,id=virblk0 \
    -drive file=${BASEDIR}/debian-12-efi.qcow2,if=none,id=drive0,discard=on \
    -net nic,model=virtio -net user \
    -chardev socket,id=chrtpm,path=${BASEDIR}/swtpm/swtpm-sock \
    -tpmdev emulator,id=tpm0,chardev=chrtpm \
    -device tpm-tis,tpmdev=tpm0 \
    -display none \
    -nographic \
    -boot menu=on
Sorting out backup internet #4: IPv6
The final piece of my 5G (well, 4G) based based backup internet connection I needed to sort out was IPv6. While Three do support IPv6 in their network they only seem to enable it for certain devices, and the MC7010 is not one of those devices, even though it also supports IPv6.
I use v6 a lot - over 50% of my external traffic, last time I looked. One suggested option was that I could drop the IPv6 Router Advertisements when the main external link went down, but I have a number of internal services that are only presented on v6 addresses so I needed to ensure clients in the house continued to have access to those.
As it happens I’ve used the Hurricane Electric IPv6 Tunnel Broker in the past, so my pass was re-instating that. The 5G link has a real external IPv4 address, and it’s possible to update the endpoint using a simple HTTP GET. I added the following to my /etc/dhcp/dhclient-exit-hooks.d/modem-interface-route where we are dealing with an interface IP change:
# Update IPv6 tunnel with Hurricane Electric
curl --interface $interface 'https://username:password@ipv4.tunnelbroker.net/nic/update?hostname=1234'
I needed some additional configuration to bring things up, so /etc/network/interfaces got the following, configuring the 6in4 tunnel as well as the low preference default route, and source routing via the 5g table, similar to IPv4:
pre-up ip tunnel add he-ipv6 mode sit remote 216.66.80.26
pre-up ip link set he-ipv6 up
pre-up ip addr add 2001:db8:1234::2/64 dev he-ipv6
pre-up ip -6 rule add from 2001:db8:1234::/64 lookup 5g
pre-up ip -6 route add default dev he-ipv6 table 5g
pre-up ip -6 route add default dev he-ipv6 metric 1000
post-down ip tunnel del he-ipv6
We need to deal with IPv4 changes in for the tunnel endpoint, so modem-interface-route also got:
ip tunnel change he-ipv6 local $new_ip_address
/etc/nftables.conf had to be taught to accept the 6in4 packets from the tunnel in the input chain:
# Allow HE tunnel
iifname "sfp.31" ip protocol 41 ip saddr 216.66.80.26 accept
Finally, I had to engage in something I never thought I’d deal with; IPv6 NAT. HE provide a /48, and my FTTP ISP provides me with a /56, so this meant I could do a nice stateless 1:1 mapping:
table ip6 nat {
  chain postrouting {
    type nat hook postrouting priority 0

    oifname "he-ipv6" snat ip6 prefix to ip6 saddr map { 2001:db8:f00d::/56 : 2001:db8:666::/56 }
  }
}
This works. Mostly. The problem is that HE, not unreasonably, expect your IPv4 address to be pingable. And it turns out Three have some ranges that this works on, and some that it doesn’t. Which means it’s a bit hit and miss whether you can setup the tunnel.
I spent a while trying to find an alternative free IPv6 tunnel provider with a UK endpoint. There’s less call for them these days, so I didn’t manage to find any that actually worked (or didn’t have a similar pingable requirement). I did consider whether I wanted to end up with routes via a VM, as I described in the failover post, but looking at costings for VMs with providers who could actually give me an IPv6 range I decided the cost didn’t make it worthwhile; the VM cost ended up being more than the backup SIM is costing monthly.
Finally, it turns out happy eyeballs mostly means that when the 5G ends up on an IP that we can’t setup the IPv6 tunnel on, things still mostly work. Browser usage fails over quickly and it’s mostly my own SSH use that needs me to force IPv4. Purists will groan, but this turns out to be an acceptable trade-off for me, at present. Perhaps if I was seeing frequent failures the diverse routes approach to a VM would start to make sense, but for now I’m pretty happy with the configuration in terms of having a mostly automatic backup link take over when the main link goes down.
Sorting out backup internet #3: failover
With local recursive DNS and a 5G modem in place the next thing was to work on some sort of automatic failover when the primary FTTP connection failed. My wife works from home too and I sometimes travel so I wanted to make sure things didn’t require me to be around to kick them into switch the link in use.
First, let’s talk about what I didn’t do. One choice to try and ensure as seamless a failover as possible would be to get a VM somewhere out there. I’d then run Wireguard tunnels over both the FTTP + 5G links to the VM, and run some sort of routing protocol (RIP, OSPF?) over the links. Set preferences such that the FTTP is preferred, NAT v4 to the VM IP, and choose somewhere that gave me a v6 range I could just use directly.
This has the advantage that I’m actively checking link quality to the outside work, rather than just to the next hop. It also means, if the failover detection is fast enough, that existing sessions stay up rather than needing re-established.
The downsides are increased complexity, adding another point of potential failure (the VM + provider), the impact on connection quality (even with a decent endpoint it’s an extra hop and latency), and finally the increased cost involved.
I can cope with having to reconnect my SSH sessions in the event of a failure, and I’d rather be sure I can make full use of the FTTP connection, so I didn’t go this route. I chose to rely on local link failure detection to provide the signal for failover, and a set of policy routing on top of that to make things a bit more seamless.
Local link failure turns out to be fairly easy. My FTTP is a PPPoE configuration, so in /etc/ppp/peers/aquiss I have:
lcp-echo-interval 1
lcp-echo-failure 5
lcp-echo-adaptive
Which gives me a failover of ~ 5s if the link goes down.
I’m operating the 5G modem in “bridge” rather than “router” mode, which means I get the actual IP from the 5G network via DHCP. The DHCP lease the modem hands out is under a minute, and in the event of a network failure it only hands out a 192.168.254.x IP to talk to its web interface. As the 5G modem is the last resort path I choose not to do anything special with this, but the information is at least there if I need it.
To allow both interfaces to be up and the FTTP to be preferred I’m simply using route metrics. For the PPP configuration that’s:
defaultroute-metric 100
and for the 5G modem I have:
iface sfp.31 inet dhcp
    metric 1000
    vlan-raw-device sfp
There’s a wrinkle in that pppd will not replace an existing default route, so I’ve created /etc/ppp/ip-up.d/default-route to ensure it’s added:
#!/bin/bash

[ "$PPP_IFACE" = "pppoe-wan" ] || exit 0

# Ensure we add a default route; pppd will not do so if we have
# a lower pref route out the 5G modem
ip route add default dev pppoe-wan metric 100 || true
Additionally, in /etc/dhcp/dhclient.conf I’ve disabled asking for any server details (DNS, NTP, etc) - I have internal setups for the servers I want, and don’t want to be trying to select things over the 5G link by default.
However, what I do want is to be able to access the 5G modem web interface and explicitly route some traffic out that link (e.g. so I can add it to my smokeping tests). For that I need some source based routing.
First step, add a 5g table to /etc/iproute2/rt_tables:
16 5g
Then I ended up with the following in /etc/dhcp/dhclient-exit-hooks.d/modem-interface-route, which is more complex than I’d like but seems to do what I want:
#!/bin/sh

case "$reason" in
    BOUND|RENEW|REBIND|REBOOT)
        # Check if we've actually changed IP address
        if [ -z "$old_ip_address" ] ||
           [ "$old_ip_address" != "$new_ip_address" ] ||
           [ "$reason" = "BOUND" ] || [ "$reason" = "REBOOT" ]; then
            if [ ! -z "$old_ip_address" ]; then
                ip rule del from $old_ip_address lookup 5g
            fi
            ip rule add from $new_ip_address lookup 5g

            ip route add default dev sfp.31 table 5g || true
            ip route add 192.168.254.1 dev sfp.31 2>/dev/null || true
        fi
    ;;

    EXPIRE)
        if [ ! -z "$old_ip_address" ]; then
            ip rule del from $old_ip_address lookup 5g
        fi
    ;;

    *)
    ;;
esac
What does all that aim to do? We want to ensure traffic directed to the 5G WAN address goes out the 5G modem, so I can SSH into it even when the main link is up. So we add a rule directing traffic from that IP to hit the 5g routing table, and a default route in that table which uses the 5G link. There’s no configuration for the FTTP connection in that table, so if the 5G link is down the traffic gets dropped, which is what we want. We also configure 192.168.254.1 to go out the link to the modem, as that’s where the web interface lives.
I also have a curl callout (curl --interface sfp.31 … to ensure it goes out the 5G link) after the routes are configured to set dynamic DNS with Mythic Beasts, which helps with knowing where to connect back to. I seem to see IP address changes on the 5G link every couple of days at least.
Additionally, I have an entry in the interfaces configuration carving out the top set of the netblock my smokeping server is in:
up ip rule add from 192.0.2.224/27 lookup 5g
My smokeping /etc/smokeping/config.d/Probes file then looks like:
*** Probes ***

+ FPing

binary = /usr/bin/fping

++ FPingNormal

++ FPing5G

sourceaddress = 192.0.2.225

+ FPing6

binary = /usr/bin/fping
which allows me to use probe = FPing5G for targets to test them over the 5G link.
That mostly covers the functionality I want for a backup link. There’s one piece that isn’t quite solved, however, IPv6, which can wait for another post.
Sorting out backup internet #2: 5G modem
Having setup recursive DNS it was time to actually sort out a backup internet connection. I live in a Virgin Media area, but I still haven’t forgiven them for my terrible Virgin experiences when moving here. Plus it involves a bigger contractual commitment. There are no altnets locally (though I’m watching youfibre who have already rolled out in a few Belfast exchanges), so I decided to go for a 5G modem. That gives some flexibility, and is a bit easier to get up and running.
I started by purchasing a ZTE MC7010. This had the advantage of being reasonably cheap off eBay, not having any wifi functionality I would just have to disable (it’s going to plug it into the same router the FTTP connection terminates on), being outdoor mountable should I decide to go that way, and, finally, being powered via PoE.
For now this device sits on the window sill in my study, which is at the top of the house. I printed a table stand for it which mostly does the job (though not as well with a normal, rather than flat, network cable). The router lives downstairs, so I’ve extended a dedicated VLAN through the study switch, down to the core switch and out to the router. The PoE study switch can only do GigE, not 2.5Gb/s, but at present that’s far from the limiting factor on the speed of the connection.
The device is 3 branded, and, as it happens, I’ve ended up with a 3 SIM in it. Up until recently my personal phone was with them, but they’ve kicked me off Go Roam, so I’ve moved. Going with 3 for the backup connection provides some slight extra measure of resiliency; we now have devices on all 4 major UK networks in the house. The SIM is a preloaded data only SIM good for a year; I don’t expect to use all of the data allowance, but I didn’t want to have to worry about unexpected excess charges.
Performance turns out to be disappointing; I end up locking the device to 4G as the 5G signal is marginal - leaving it enabled results in constantly switching between 4G + 5G and a significant extra latency. The smokeping graph below shows a brief period where I removed the 4G lock and allowed 5G:
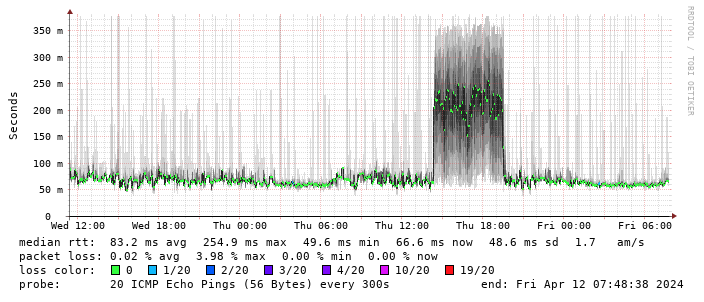
(There’s a handy zte.js script to allow doing this from the device web interface.)
I get about 10Mb/s sustained downloads out of it. EE/Vodafone did not lead to significantly better results, so for now I’m accepting it is what it is. I tried relocating the device to another part of the house (a little tricky while still providing switch-based PoE, but I have an injector), without much improvement. Equally pinning the 4G to certain bands provided a short term improvement (I got up to 40-50Mb/s sustained), but not reliably so.

This is disappointing, but if it turns out to be a problem I can look at mounting it externally. I also assume as 5G is gradually rolled out further things will naturally improve, but that might be wishful thinking on my part.
Rather than wait until my main link had a problem I decided to try a day working over the 5G connection. I spend a lot of my time either in browser based apps or accessing remote systems via SSH, so I’m reasonably sensitive to a jittery or otherwise flaky connection. I picked a day that I did not have any meetings planned, but as it happened I ended up with an adhoc video call arranged. I’m pleased to say that it all worked just fine; definitely noticeable as slower than the FTTP connection (to be expected), but all workable and even the video call was fine (at least from my end). Looking at the traffic graph shows the expected ~ 10Mb/s peak (actually a little higher, and looking at the FTTP stats for previous days not out of keeping with what we see there), and you can just about see the ~ 3Mb/s symmetric use by the video call at 2pm:
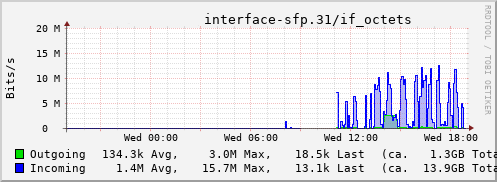
The test run also helped iron out the fact that the content filter was still enabled on the SIM, but that was easily resolved.
Up next, vaguely automatic failover.
Sorting out backup internet #1: recursive DNS
I work from home these days, and my nearest office is over 100 miles away, 3 hours door to door if I travel by train (and, to be honest, probably not a lot faster given rush hour traffic if I drive). So I’m reliant on a functional internet connection in order to be able to work. I’m lucky to have access to Openreach FTTP, provided by Aquiss, but I worry about what happens if there’s a cable cut somewhere or some other long lasting problem. Worst case I could tether to my work phone, or try to find some local coworking space to use while things get sorted, but I felt like arranging a backup option was a wise move.
Step 1 turned out to be sorting out recursive DNS. It’s been many moons since I had to deal with running DNS in a production setting, and I’ve mostly done my best to avoid doing it at home too. dnsmasq has done a decent job at providing for my needs over the years, covering DHCP, DNS (+ tftp for my test device network). However I just let it forward to my ISP’s nameservers, which means if that link goes down it’ll no longer be able to resolve anything outside the house.
One option would have been to either point to a different recursive DNS server (Cloudfare’s 1.1.1.1 or Google’s Public DNS being the common choices), but I’ve no desire to share my lookup information with them. As another approach I could have done some sort of failover of resolv.conf when the primary network went down, but then I would have to get into moving files around based on networking status and that felt a bit clunky.
So I decided to finally setup a proper local recursive DNS server, which is something I’ve kinda meant to do for a while but never had sufficient reason to look into. Last time I did this I did it with BIND 9 but there are more options these days, and I decided to go with unbound, which is primarily focused on recursive DNS.
One extra wrinkle, pointed out by Lars, is that having dynamic name information from DHCP hosts is exceptionally convenient. I’ve kept dnsmasq as the local DHCP server, so I wanted to be able to forward local queries there.
I’m doing all of this on my RB5009, running Debian. Installing unbound was a simple matter of apt install unbound. I needed 2 pieces of configuration over the default, one to enable recursive serving for the house networks, and one to enable forwarding of queries for the local domain to dnsmasq. I originally had specified the wildcard address for listening, but this caused problems with the fact my router has many interfaces and would sometimes respond from a different address than the request had come in on.
/etc/unbound/unbound.conf.d/network-resolver.conf
server:
  interface: 192.0.2.1
  interface: 2001::db8:f00d::1
  access-control: 192.0.2.0/24 allow
  access-control: 2001::db8:f00d::/56 allow
/etc/unbound/unbound.conf.d/local-to-dnsmasq.conf
server:
  domain-insecure: "example.org"
  do-not-query-localhost: no

forward-zone:
  name: "example.org"
  forward-addr: 127.0.0.1@5353
I then had to configure dnsmasq to not listen on port 53 (so unbound could), respond to requests on the loopback interface (I have dnsmasq restricted to only explicitly listed interfaces), and to hand out unbound as the appropriate nameserver in DHCP requests - once dnsmasq is not listening on port 53 it no longer does this by default.
/etc/dnsmasq.d/behind-unbound
interface=lo
port=5353
dhcp-option=option6:dns-server,[2001::db8:f00d::1]
dhcp-option=option:dns-server,192.0.2.1
With these minor changes in place I now have local recursive DNS being handled by unbound, without losing dynamic local DNS for DHCP hosts. As an added bonus I now get 10/10 on Test IPv6 - previously I was getting dinged on the ability for my DNS server to resolve purely IPv6 reachable addresses.
Next step, actually sorting out a backup link.
subscribe via RSS